HP StorageWorks MSA1000 HP StorageWorks Modular Smart Array 1000 Small Busines - Page 3
Con the SAN: Windows, Connect the cables, Power on the components, Record system information, - controller module
 |
View all HP StorageWorks MSA1000 manuals
Add to My Manuals
Save this manual to your list of manuals |
Page 3 highlights
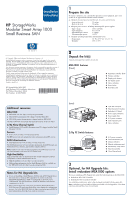
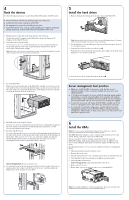
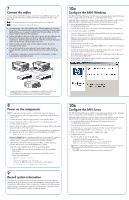
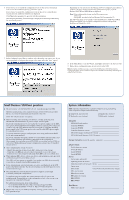
7 Connect the cables Connect the provided Fibre Channel cables between the HBA in the server and the switch, and between the switch and the Fibre Channel I/O module of the MSA1000. Note: Serial or Ethernet cables are not required during this initial configuration. Note: Do not yet connect power cables to the devices. ● Use appropriate care when handling Fibre Channel cables: do not touch the end of a Fibre channel cable, do not coil or bind Fibre Channel cables tightly, and be sure to support installed Fibre Channel cables, so that no excess weight is placed on the connectors. ● Gather the cables in the rear of the rack to ensure that the cabling in the back of the rack system does not interfere with system operation or maintenance. Bind the cables loosely with cable ties and route the excess cables out of the way, along the side of the rack. ● Attach a label near both ends of each cable to identify the device connected to that cable. ● Use colorful markers to color-code both ends of each cable, to help visually identify a particular cable without having to read or locate the label. ● In redundant configurations, loosely bind the matching pair of cables connecting the redundant devices. 10a Configure the SAN: Windows The MSA1000 Small Business SAN kit comes with an installation wizard, allowing you to configure the switch, the HBAs, and the MSA1000 storage. Although other configuration methods are provided in the shipping carton with the MSA1000, HP recommends using the method described in this document. 1. Locate the Small Business SAN Software CD and insert it into the CD-ROM drive of the server. The CD automatically starts and displays the HP Small Business SAN Wizard. 2. In the Welcome window, click Next. Several windows may be displayed, while the HBA driver and some additional software components are installed. Note: A recent operating system update that supports multi-pathing is required for this installation. If this update is not found on the server, the Installation Wizard will prompt you to load it at this time. 3. When prompted, restart the server. 4. In the Attach Storage window, click Show SAN to view a display of all currently connected devices. Use the information in this display to verify the connectivity of your devices. Specifically, verify connectivity to the MSA1000. If the MSA1000 is not detected, check all cable connections between the server, the switch, and the MSA1000. 5. In the Manage SAN window, indicate whether you want to install storage configuration tools on this server. Sample multi-path configuration, including both the Small Business SAN kit and the HA Upgrade kit. Includes two servers and two switches accessing an MSA1000 with two controllers and two Fibre Channel I/O modules. 8 Power on the components NOTE: Storage systems must be powered-on using the following specific sequence. 1. Connect the power cables and apply power to each Uninterruptable Power Supply (UPS). 2. Connect the power cables and apply power to each 2/8q FC switch. 3. Connect the power cables and apply power to any additional (optional) external storage enclosures. 4. Connect the power cables to the MSA1000 and start up the MSA by pressing the power button on the front panel. 5. Wait (up to four minutes) for the MSA1000 start-up routine to complete and the following message to be displayed on the LCD panel of the MSA: MSA1000 Startup Complete Note for HA Upgrade kits: If a redundant controller and Fibre Channel I/O module are installed in the MSA, the CLONE FIRMWARE message may be displayed on the controller. Press ">" to copy the firmware from one controller to the other. 6. Apply power to the servers with access to the MSA, start the operating systems, and log on as a user with administrative control. 7. Verify that each component in the SAN is operating properly. - View the LED indicators on each component and look for irregular illuminations. - Press the display push buttons on the front of the MSA and look for the following messages: MSA1000 Startup Complete Fibre Sub-System Link Failure (because the HBA driver is not yet installed, can be ignored) Array controller firmware ver 9 Record system information Locate the System information panel on this document and record important information about the devices in your SAN. Information requested in this form is helpful for multi-pathing, future configuration changes, and troubleshooting. When using the Small Business SAN Wizard, information is displayed on the MSA1000 LCD panel and in a window behind the Wizard. 10b Configure the SAN: Linux The MSA1000 Small Business SAN kit comes with an installation script, allowing you to configure the switch, the HBAs, and the MSA1000 storage. Although other configuration methods are provided in the shipping carton with the MSA1000, HP recommends using the method described in this document. 1. Locate the Small Business SAN Software CD and insert it into the CD-ROM drive of the server. The CD automatically mounts and executes an installation script. If the CD does not auto-mount, mount the CD and execute the Small Business Linux Wizard script from the /Linux directory. (install_smb) 2. Follow the onscreen instructions to complete the script. 3. Configure the storage. To start the ACU, do one of the following: - At the MSA1000 CLI prompt, enter: cpqacuxe. - At the Netscape browser, enter http://servername:2301, where servername is the name or IP address of the server. Note: When configuring the storage, be sure to identify the operating system of each Linux HBA connected to the MSA1000. For assistance, use the following resources: - Online help - User guides - provided on the Small Business SAN Documentation CD
-
 1
1 -
 2
2 -
 3
3 -
 4
4
 |
 |
