HP StorageWorks MSA2312fc HP StorageWorks 2000 G2 Modular Smart Array Controll - Page 4
Installing the new module, Verifying proper operation, Verifying configuration settings - dual controller array
 |
View all HP StorageWorks MSA2312fc manuals
Add to My Manuals
Save this manual to your list of manuals |
Page 4 highlights
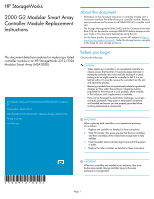
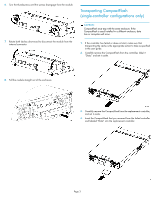
Installing the new module 1. With the latches in the open position, slide the module into the enclosure as far as it will go (1). If necessary, press lightly on the top-center of the module to facilitate insertion. 2. Rotate the latches upward to engage the module with the internal connector (2) and then, turn the thumbscrews finger-tight (3). Verifying configuration settings After replacing a controller, verify that system configuration settings are set properly for your environment. Repeat the commands shown in "Recording configuration settings" on page 2 and compare the current values with those recorded before the installation. If necessary, change the settings to their previous values. For more information, see online help or the enclosure user guide. Verifying the firmware version After installing a controller, verify that the latest firmware is installed on all controllers in the enclosure. Go to the HP Support website at nl http://www.hp.com/support and navigate to the page for your enclosure. If newer firmware is available, download the firmware from the Web to your local system and install that latest version on the controllers. For more information on firmware updates, see the enclosure user guide. 3. Reconnect the cables. NOTE: After installing a controller in an operational, dual-controller system, the new controller automatically begins to initialize. If the firmware versions differ between the two controllers, Partner Firmware Upgrade feature brings the older firmware to the later firmware level. 4. In operational systems, if additional hardware components, such as a second controller, need replacing or installing, wait 30 minutes before proceeding with those procedures. This time frame ensures that the controller(s) and their ownership of vdisks are fully stabilized. Returning the failed items In materials shipped with the replacement, HP specifies whether the failed component must be returned. Follow the provided instructions. Additional information HP P2000/MSA Disk Arrays: http://www.hp.com/go/msa HP storage: http://www.hp.com/storage HP support: http://www.hp.com/support HP documents: http://www.hp.com/support/manuals Verifying proper operation After replacing the controller, check that the OK LED (back) illuminates green, indicating that the controller has completed initializing and is online. If the Fault/Service Required LED is amber, the module has not gone online and likely failed its self-test. Check the event log for errors and put the module online by restarting a controller. To restart a controller, enter the following command: restart sc a|b, where a or b represents the controller. If the enclosure UID is on, do the following to turn it off: set led enclosure 1 off Page 4
-
 1
1 -
 2
2 -
 3
3 -
 4
4
 |
 |