HP StorageWorks Modular Smart Array 1000 HP StorageWorks Power Supply/Blower M - Page 3
Installing a power supply, Verifying proper operation, Returning the failed component
 |
View all HP StorageWorks Modular Smart Array 1000 manuals
Add to My Manuals
Save this manual to your list of manuals |
Page 3 highlights
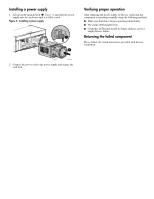
Installing a power supply 1. Lift up on the module latch (1, Figure 5) and slide the power supply into the enclosure until it is fully seated. Figure 5: Installing a power supply 1 2 0010a 2. Connect the power cord to the power supply and engage the cord lock. Verifying proper operation After replacing the power supply or blower, verify that the component is operating normally using the following methods: ■ Make sure the blower begins operating immediately. ■ The status LED should be On. ■ Controller LCD panel should no longer indicate a power supply/blower failure. Returning the failed component Please follow the return instructions provided with the new component.
-
 1
1 -
 2
2 -
 3
3
 |
 |

Installing a power supply
1.
Lift up on the module latch (
1
,
Figure 5
) and slide the power
supply into the enclosure until it is fully seated.
Figure 5:
Installing a power supply
2.
Connect the power cord to the power supply and engage the
cord lock.
Verifying proper operation
After replacing the power supply or blower, verify that the
component is operating normally using the following methods:
■
Make sure the blower begins operating immediately.
■
The status LED should be On.
■
Controller LCD panel should no longer indicate a power
supply/blower failure.
Returning the failed component
Please follow the return instructions provided with the new
component.
1
2
0010a