HP Surestore 80ex Adding 1 Drive to the C1100 Series Jukebox - C1156-90000 - Page 8
Front Panel Tilted
 |
View all HP Surestore 80ex manuals
Add to My Manuals
Save this manual to your list of manuals |
Page 8 highlights
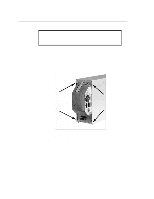
7. Rotate the front bezel out and disconnect the front panel cable and the mailslot sensor cable. NOTE A tab on the top of the mailslot sensor cable must be released before the cable can be unhooked. Insert a small screwdriver and push this tab down (see inset in Figure 6). ***** Front Panel Tilted out ***** Figure 6: Front panel tilted out 8. Remove the RFI shield. Note The cables/connectors for the additional drive are already in place in the jukebox. You will only have to mount the drive and connect it to the cables. 8
-
 1
1 -
2
-
 3
3 -
 4
4 -
 5
5 -
 6
6 -
 7
7 -
 8
8 -
 9
9 -
 10
10 -
 11
11 -
 12
12
 |
 |

8
7.
Rotate the front bezel out and disconnect the front panel cable and the mailslot sensor cable.
Figure 6:
Front panel tilted out
8.
Remove the RFI shield.
NOTE
A tab on the top of the mailslot sensor cable must be released
before the cable can be unhooked.
Insert a small screwdriver
and push this tab down (see inset in Figure 6).
Note
The cables/connectors for the additional drive are already in
place in the jukebox. You will only have to mount the drive
and connect it to the cables.
*****
*****
Front Panel Tilted
out