HP Surestore E Tape Library Model 6/60 Setting Up Your HP SureStore E Tape Lib - Page 2
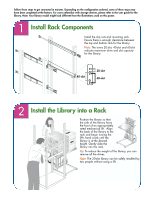
Install Rack Components, Install the Library into a Rack
 |
View all HP Surestore E Tape Library Model 6/60 manuals
Add to My Manuals
Save this manual to your list of manuals |
Page 2 highlights
Follow these steps to get connected in minutes. Depending on the configuration ordered, some of these steps may have been completed at the factory. For users unfamiliar with storage devices, please refer to the user guide for the library. Note: Your library model might look different from the illustrations used on this poster. Install Rack Components Install the clip nuts and mounting rails. Ensure there is enough clearance between the top and bottom rails for the library. Note: The terms 20-slot, 40-slot and 60-slot indicate maximum drive and slot capacity for the library. 40-slot 20-slot 60-slot Install the Library into a Rack Position the library so that the side of the library faces the front of an appropriately rated mechanical lift. Align the back of the library to the rack and begin turning the lift's hand crank until the library is at the desired height. Gently slide the library into the rack. Tip: To reduce the weight of the library, you can remove all the drives. Note: The 20-slot library can be safely installed by two people without using a lift.
-
 1
1 -
 2
2 -
 3
3 -
 4
4 -
 5
5 -
 6
6 -
 7
7
 |
 |
