HP T5725 Hardware Reference Guide: HP Compaq t5720/t5725 Thin Client - Page 30
When attached, the HP Quick Release automatically locks
 |
UPC - 882780693333
View all HP T5725 manuals
Add to My Manuals
Save this manual to your list of manuals |
Page 30 highlights
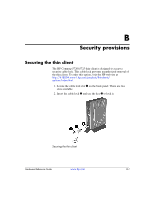
Mounting the thin client 3. Slide the side of the mounting device attached to the thin client 1 over the other side of the mounting device 2 on the device on which you want to mount the thin client. An audible 'click' indicates a secure connection. Connecting the thin client ✎ When attached, the HP Quick Release automatically locks in position. You only need to slide the lever to one side to remove the thin client. Ä CAUTION: To ensure proper function of the HP Quick Release and a secure connection of all components, make sure both the release lever on one side of the mounting device and the rounded opening on the other side face upward. C-4 www.hp.com Hardware Reference Guide
-
 1
1 -
2
-
3
-
4
-
5
-
6
-
7
-
8
-
9
-
10
-
11
-
12
-
13
-
14
-
15
-
16
-
17
-
18
-
19
-
20
-
21
-
22
-
23
-
24
-
 25
25 -
 26
26 -
 27
27 -
 28
28 -
 29
29 -
 30
30 -
 31
31 -
 32
32 -
 33
33 -
 34
34 -
 35
35 -
36
-
37
-
38
-
39
-
40
-
41
-
42
-
43
-
44
-
45
-
46
-
47
-
48
 |
 |

C-4
www.hp.com
Hardware Reference Guide
Mounting the thin client
3.
Slide the side of the mounting device attached to the thin client
1
over the other side of the mounting device
2
on the device on
which you want to mount the thin client. An audible ‘click’
indicates a secure connection.
Connecting the thin client
✎
When attached, the HP Quick Release automatically locks in
position. You only need to slide the lever to one side to remove the
thin client.
Ä
CAUTION:
To ensure proper function of the HP Quick Release and a
secure connection of all components, make sure both the release lever on
one side of the mounting device and the rounded opening on the other
side face upward.