HP Visualize c3000 hp Visualize b1000, c3000, c3600 workstations parts replace - Page 16
Power Supply
 |
View all HP Visualize c3000 manuals
Add to My Manuals
Save this manual to your list of manuals |
Page 16 highlights
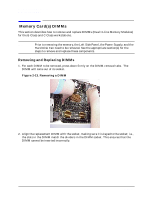
Parts Removal and Replacement Power Supply Power Supply This section describes how to remove and replace the power supply. NOTE Prior to removing the Power Supply, the Front Panel and the Left Side Panel need to be removed. See the appropriate section(s) for the steps to remove and replace these components. Removing the Power Supply 1. Position the workstation on its side. Use a cushioned surface to protect the exterior of the system from damage. 2. Position the conductive sheeting so that an inch of one edge is under the workstation and the rest is flat against the work area to lay system components on after you remove them. Also ensure that your static-grounding strap is securely attached to your wrist and to bare metal on the workstation. Figure 2-7. Power Supply Screws and Handles T15 Torx Thumbscrew Power Supply Handle T15 Torx Thumbscrew 3. Alternately loosen the two T-15 Torx screws from the corners of the power supply as shown above. 4. Using the handle, lift up the power supply and place the bail in the bail lock to hold the power supply upright. 16 Chapter 2
-
 1
1 -
2
-
3
-
4
-
5
-
6
-
7
-
8
-
9
-
10
-
 11
11 -
 12
12 -
 13
13 -
 14
14 -
 15
15 -
 16
16 -
 17
17 -
 18
18 -
 19
19 -
 20
20 -
 21
21 -
22
-
23
-
24
-
25
-
26
-
27
-
28
-
29
-
30
-
31
-
32
-
33
-
34
-
35
-
36
-
37
-
38
-
39
-
40
-
41
-
42
-
43
-
44
-
45
-
46
-
47
-
48
 |
 |
