HP Visualize c3000 hp Visualize b1000, c3000, c3600 workstations parts replace - Page 33
Hard Disk Drive
 |
View all HP Visualize c3000 manuals
Add to My Manuals
Save this manual to your list of manuals |
Page 33 highlights
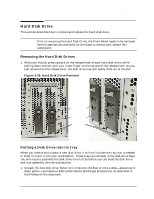
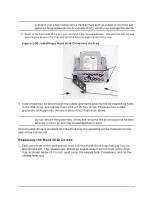
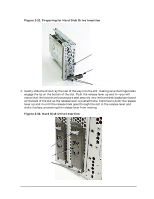
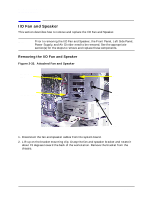
Parts Removal and Replacement Hard Disk Drive Hard Disk Drive This section describes how to remove and replace the hard disk drive. NOTE Prior to removing the Hard Disk Drive, the Front Panel needs to be removed. See the appropriate section(s) for the steps to remove and replace this component. Removing the Hard Disk Drives 1. With your thumb, press upward on the release hook of each hard disk drive, while pulling down and out with your index finger on the top end of the release lever. As you pull outward on the release lever, the disk drive tray will easily slide out of the slot. Figure 2-29. Hard Disk Drive Removal Release Hook Release Lever Hinge Hooks Putting a Disk Drive into its Tray When you receive and unpack a new disk drive, it will not include the tray that is needed in order to insert it into your workstation. These trays are already in the disk-drive bays. You will need to assemble the disk drive into its tray before you can slide the disk drive and tray assembly into the workstation. 1. Unpack the new disk drive. Never let it drop onto the floor or onto a desk-always set it down gently-and observe ESD (electrostatic discharge) precautions, as described in the Preface of this document. Chapter 2 33
-
 1
1 -
2
-
3
-
4
-
5
-
6
-
7
-
8
-
9
-
10
-
11
-
12
-
13
-
14
-
15
-
16
-
17
-
18
-
19
-
20
-
21
-
22
-
23
-
24
-
25
-
26
-
27
-
 28
28 -
 29
29 -
 30
30 -
 31
31 -
 32
32 -
 33
33 -
 34
34 -
 35
35 -
 36
36 -
 37
37 -
 38
38 -
39
-
40
-
41
-
42
-
43
-
44
-
45
-
46
-
47
-
48
 |
 |
