HP Workstation i2000 hp workstation i2000 Linux 7.1 read before installing (a6 - Page 2
Welcome to Linux - manual
 |
View all HP Workstation i2000 manuals
Add to My Manuals
Save this manual to your list of manuals |
Page 2 highlights
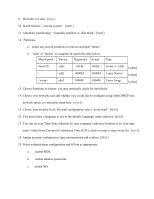
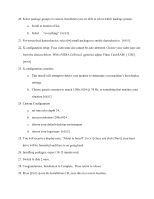
9. Welcome to Linux [NEXT] 10. Install Options "custom system" [NEXT] 11. Automatic partitioning; "manually partition w/ disk druid" [NEXT] 12. Partitions a. Select any and all partitions to remove and push "delete" b. "Add" or "Delete" to complete & match the table below: Mount point Device Requested Actual Type /boot/efi / sda1 sda2 sda5 101M 6000M 1000M 101M 6000M 1004M 16-bit >= 32M Linux Native Linux Swap [select] [select] [select] 13. Choose Partitions to format; you may optionally check for bad blocks. 14. Choose your network card and whether you would like to configure using either DHCP (see network admin.) or manually setup here. [NEXT] 15. Choose your security level; Firewall configuration select "no firewall" [NEXT] 16. You must select a language to use as the default Language; make selection [NEXT] 17. You can set your Time Zone selection by your computer's physical location or by your time zone's offset from Universal Coordinated Time (UTC); click on map or select from list. [NEXT] 18. Assign account configuration; type root password and confirm [NEXT] 19. Select authentication configuration and fill out as appropriate; a. enable MD5, b. enable shadow passwords c. enable NIS
-
 1
1 -
 2
2 -
 3
3 -
 4
4
 |
 |