| Section |
Page |
| ELSA Synergy II/GLoria II User’s Guide |
1 |
| ELSA Synergy II/GLoria II User’s Guide |
1 |
| ELSA Synergy II/GLoria II User’s Guide |
1 |
| Printed in USA ��December 1999 |
1 |
| Manufacturing Part Number:� HP Part No. A1280-90026 |
1 |
| Edition 1299 |
1 |
| © Copyright 1999 |
1 |
| © Copyright 1999 |
1 |
| Hewlett-Packard Company |
1 |
| Notice |
2 |
| Notice |
2 |
| The information contained in this document is subject to change without notice. Hewlett-Packard m... |
2 |
| The ELSA logo is a registered trademark of ELSA AG. |
2 |
| Hewlett-Packard Company 3404 E. Harmony Road Fort Collins, CO 80528-9599 USA |
2 |
| Preface |
5 |
| Preface |
5 |
| This document provides an explanation of the features and specifications of the ELSA Synergy II a... |
5 |
| Bibliography |
6 |
| Bibliography |
6 |
| For more information, you can go to the following web site: |
6 |
| http://www.elsa.com/ |
6 |
| http://www.elsa.com/ |
6 |
| Important Ergonomic Information |
6 |
| Important Ergonomic Information |
6 |
| It is strongly recommended that you read the ergonomic information before using your HP Visualize... |
6 |
| Installation Notice |
6 |
| Installation Notice |
6 |
| Products designated in the applicable Hewlett-Packard price list as customer-installable can be i... |
6 |
| Revision History |
6 |
| Revision History |
6 |
| The revision history for each edition of the manual is listed below: |
6 |
| Edition |
6 |
| Edition |
6 |
| Edition |
6 |
| Revision History |
6 |
| Revision History |
6 |
| E1299 |
6 |
| E1299 |
6 |
| First Printing |
6 |
| First Printing |
6 |
| Problems, Questions, and Suggestions |
6 |
| Problems, Questions, and Suggestions |
6 |
| If you have any problems or questions with our hardware, software, or documentation, please conta... |
6 |
| Documentation Conventions |
7 |
| Documentation Conventions |
7 |
| Unless otherwise noted in the text, this guide uses the following symbolic conventions. |
7 |
| <TABLE> |
7 |
| <TABLE BODY> |
7 |
| <TABLE ROW> |
7 |
| user-supplied values |
7 |
| Italic words or characters in syntax and command descriptions represent values that you must supp... |
7 |
| <TABLE ROW> |
7 |
| screen display |
7 |
| Information that the system displays, commands that you must use literally, and path names appear... |
7 |
| <TABLE ROW> |
7 |
| Enter |
7 |
| Enter |
7 |
| Key caps are presented with a special keycap font as shown in the left column. (In this document,... |
7 |
| Electrostatic Discharge (ESD) Precautions |
7 |
| Electrostatic Discharge (ESD) Precautions |
7 |
| ESD (electrostatic discharge) |
7 |
| ESD (electrostatic discharge) |
7 |
| Electrostatic discharge (ESD) |
7 |
| • Stand on a static-free mat. |
7 |
| • Stand on a static-free mat. |
7 |
| • Stand on a static-free mat. |
7 |
| • Wear a static strap to ensure that any accumulated electrostatic charge is discharged from your... |
7 |
| • Wear a static strap to ensure that any accumulated electrostatic charge is discharged from your... |
7 |
| • Create a common ground for the equipment you are working on by connecting the static-free mat, ... |
7 |
| • Create a common ground for the equipment you are working on by connecting the static-free mat, ... |
7 |
| • Keep uninstalled printed circuit boards in their protective antistatic bags. |
7 |
| • Keep uninstalled printed circuit boards in their protective antistatic bags. |
7 |
| • Handle printed circuit boards by their edges, once you have removed them from their protective ... |
7 |
| • Handle printed circuit boards by their edges, once you have removed them from their protective ... |
7 |
| 1� ELSA SYNERGY II and GLoria II Graphics Cards |
9 |
| 1� ELSA SYNERGY II and GLoria II Graphics Cards |
9 |
| Introduction |
10 |
| Introduction |
10 |
| This section contains a brief overview of the ELSA Synergy II and GLoria II graphics cards. This ... |
10 |
| <GRAPHIC> |
10 |
| The ELSA Synergy II Graphics Card |
10 |
| The ELSA Synergy II Graphics Card |
10 |
| You have the option of selecting an ELSA Synergy II graphics card for your HP Visualize Personal ... |
10 |
| The Synergy II’s TNT2 graphics processor communicates directly with the Pentium III processor alo... |
10 |
| Features |
10 |
| Features |
10 |
| • Optimized all-round capabilities in 2D and 3D |
10 |
| • Optimized all-round capabilities in 2D and 3D |
10 |
| • High resolution with 1920 by 1200 pixels in True color, at 60 Hz max. refresh |
10 |
| • 2D performance and high-power 3D hardware acceleration |
10 |
| • Supports 16:10 wide-format monitors. |
10 |
| Specifications |
10 |
| Specifications |
10 |
| • Supports AGP 2x or AGP 4x modes |
10 |
| • Supports AGP 2x or AGP 4x modes |
10 |
| • Serial EEPROM video BIOS interface (up to 64 KB) |
10 |
| • AGP ATX form factor compliant |
10 |
| • NVIDIA RIVA TNT2 graphics processor |
10 |
| • Pixel clock maximum frequency of 250 MHz |
10 |
| • 3D standards |
11 |
| • Hardware accelerated OpenGL |
11 |
| • 32 MB of memory installed on the graphics card |
11 |
| • Standards: VESA Video BIOS, DPMS, DDC2B, Plug & Play. |
11 |
| • Video standards: DirectDraw, ActiveMovie 1.0, DirectShow (ActiveMovie 2.0). |
11 |
| Video Memory |
11 |
| Video Memory |
11 |
| The video memory is a local block of RAM for holding major data structures: Frame Buffer (double ... |
11 |
| The NVIDIA RIVA TNT2 graphics processor dynamically allocates the memory. The higher the resoluti... |
11 |
| Available Video Resolutions |
11 |
| Available Video Resolutions |
11 |
| If the resolution/refresh-rate combination is set higher than the display can support, you risk d... |
11 |
| The table below summarizes the 3D video resolutions which are supported. |
11 |
| <TABLE> |
11 |
| Table�1�1.� Supported 3D Video Resolutions |
11 |
| <TABLE BODY> |
11 |
| <TABLE ROW> |
11 |
| Resolution |
11 |
| Resolution |
11 |
| max. refresh rate (Hz) for HighColor/True Color |
11 |
| max. refresh rate (Hz) for HighColor/True Color |
11 |
| 3D Resolution with Double Buffering |
11 |
| 3D Resolution with Double Buffering |
11 |
| <TABLE ROW> |
11 |
| HighColor (16 bit) |
11 |
| HighColor (16 bit) |
11 |
| TrueColor (24bit/32bit) |
11 |
| TrueColor (24bit/32bit) |
11 |
| <TABLE ROW> |
11 |
| 32 MB |
11 |
| 32 MB |
11 |
| 32 MB |
11 |
| 32 MB |
11 |
| <TABLE ROW> |
11 |
| 1920 ° 1200 |
11 |
| 60 |
11 |
| 60 |
11 |
| All resolutions supported |
11 |
| All resolutions supported |
11 |
| <TABLE ROW> |
11 |
| 1920 ° 1080 |
11 |
| 1920 ° 1080 |
11 |
| 72 |
11 |
| 72 |
11 |
| <TABLE ROW> |
11 |
| 1600 ° 1200 |
11 |
| 1600 ° 1200 |
11 |
| 75 |
11 |
| 75 |
11 |
| <TABLE ROW> |
11 |
| 1600 ° 1000 |
11 |
| 1600 ° 1000 |
11 |
| 75 |
11 |
| 75 |
11 |
| <TABLE ROW> |
11 |
| 1280 ° 1024 |
11 |
| 1280 ° 1024 |
11 |
| 100 |
11 |
| 100 |
11 |
| <TABLE ROW> |
11 |
| 1152 ° 864 |
11 |
| 1152 ° 864 |
11 |
| 120 |
11 |
| 120 |
11 |
| <TABLE ROW> |
11 |
| 1024 ° 768 |
11 |
| 1024 ° 768 |
11 |
| 120 |
11 |
| 120 |
11 |
| <TABLE ROW> |
11 |
| 800 ° 600 |
11 |
| 800 ° 600 |
11 |
| 120 |
11 |
| 120 |
11 |
| <TABLE ROW> |
11 |
| 640 ° 480 |
11 |
| 640 ° 480 |
11 |
| 120 |
11 |
| 120 |
11 |
| ELSA GLoria II Graphics Card |
12 |
| ELSA GLoria II Graphics Card |
12 |
| <GRAPHIC> |
12 |
| You have the option of selecting an ELSA Gloria II graphics card for your HP Visualize Personal W... |
12 |
| The GLoria II’s Quadro graphics processor communicates directly with the Pentium III processor al... |
12 |
| Features |
12 |
| Features |
12 |
| • Optimized all-round capabilities in 2D and 3D |
12 |
| • Optimized all-round capabilities in 2D and 3D |
12 |
| • High resolution with 1920 by 1200 pixels in True color, at 72 Hz max. refresh |
12 |
| • 2D performance and high-power 3D hardware acceleration |
12 |
| • Supports 16:10 wide-format monitors. |
12 |
| Specifications |
12 |
| Specifications |
12 |
| • Supports AGP 2x or AGP 4x modes |
12 |
| • Supports AGP 2x or AGP 4x modes |
12 |
| • Serial EEPROM video BIOS interface (up to 64 KB) |
12 |
| • AGP ATX form factor compliant |
12 |
| • NVIDIA Quadro graphics processor |
12 |
| • Pixel clock maximum frequency of 300 MHz |
12 |
| • 3D standards |
12 |
| • Hardware accelerated OpenGL |
12 |
| • 64 MB of memory installed on the graphics card |
12 |
| • Standards: VESA Video BIOS, DPMS, DDC2B, Plug & Play. |
12 |
| • Video standards: DirectDraw, ActiveMovie 1.0, DirectShow (ActiveMovie 2.0). |
12 |
| GLoria II Video Memory |
13 |
| GLoria II Video Memory |
13 |
| The video memory is a local block of RAM for holding major data structures: Frame Buffer (double ... |
13 |
| The NVIDIA Quadro graphics processor dynamically allocates the memory. The higher the resolution ... |
13 |
| Available GLoria II Video Resolutions |
13 |
| Available GLoria II Video Resolutions |
13 |
| If the resolution/refresh-rate combination is set higher than the display can support, you risk d... |
13 |
| The table below summarizes the 3D video resolutions which are supported. |
13 |
| <TABLE> |
13 |
| Table�1�2.� Supported 3D Video Resolutions |
13 |
| <TABLE BODY> |
13 |
| <TABLE ROW> |
13 |
| Resolution |
13 |
| Resolution |
13 |
| max. refresh rate (Hz) for HighColor/True Color |
13 |
| max. refresh rate (Hz) for HighColor/True Color |
13 |
| 3D Resolution with Double Buffering |
13 |
| 3D Resolution with Double Buffering |
13 |
| <TABLE ROW> |
13 |
| HighColor (16 bit) |
13 |
| HighColor (16 bit) |
13 |
| TrueColor (24bit/32bit) |
13 |
| TrueColor (24bit/32bit) |
13 |
| <TABLE ROW> |
13 |
| 32 MB |
13 |
| 32 MB |
13 |
| 32 MB |
13 |
| 32 MB |
13 |
| <TABLE ROW> |
13 |
| 2048 °1536 |
13 |
| 2048 °1536 |
13 |
| 70 |
13 |
| 70 |
13 |
| All resolutions supported |
13 |
| All resolutions supported |
13 |
| All resolutions supported |
13 |
| All resolutions supported |
13 |
| <TABLE ROW> |
13 |
| 1920 ° 1200 |
13 |
| 1920 ° 1200 |
13 |
| 72 |
13 |
| 72 |
13 |
| <TABLE ROW> |
13 |
| 1920 ° 1080 |
13 |
| 1920 ° 1080 |
13 |
| 85 |
13 |
| 85 |
13 |
| <TABLE ROW> |
13 |
| 1600 ° 1200 |
13 |
| 1600 ° 1200 |
13 |
| 85 |
13 |
| 85 |
13 |
| <TABLE ROW> |
13 |
| 1600 ° 1000 |
13 |
| 1600 ° 1000 |
13 |
| 85 |
13 |
| <TABLE ROW> |
13 |
| 1280 ° 1024 |
13 |
| 1280 ° 1024 |
13 |
| 120 |
13 |
| 120 |
13 |
| <TABLE ROW> |
13 |
| 1152 ° 864 |
13 |
| 1152 ° 864 |
13 |
| 120 |
13 |
| 120 |
13 |
| <TABLE ROW> |
13 |
| 1024 ° 768 |
13 |
| 1024 ° 768 |
13 |
| 120 |
13 |
| 120 |
13 |
| <TABLE ROW> |
13 |
| 800 ° 600 |
13 |
| 800 ° 600 |
13 |
| 120 |
13 |
| 120 |
13 |
| <TABLE ROW> |
13 |
| 640 ° 480 |
13 |
| 640 ° 480 |
13 |
| 120 |
13 |
| 120 |
13 |
| Important Safety Instructions |
14 |
| Important Safety Instructions |
14 |
| WARNING If you have any doubt that you can lift the HP Visualize Personal Workstation or display ... |
14 |
| WARNING If you have any doubt that you can lift the HP Visualize Personal Workstation or display ... |
14 |
| CAUTION Static electricity can damage electronic components. Therefore, anytime you handle an acc... |
14 |
| CAUTION Static electricity can damage electronic components. Therefore, anytime you handle an acc... |
14 |
| Installing, Updating and Configuring the Cards |
15 |
| Installing, Updating and Configuring the Cards |
15 |
| This section contains the following subsections: |
15 |
| • Installing an ELSA graphics gard |
15 |
| • Installing an ELSA graphics gard |
15 |
| • Updating the ELSA graphics driver |
15 |
| • Configuring the ELSA graphics ddriver |
15 |
| • Troubleshooting |
15 |
| Installing an ELSA Graphics Card |
15 |
| Installing an ELSA Graphics Card |
15 |
| 1. Before installing your graphics card, disconnect all power, peripheral, and telecommunications... |
15 |
| 1. Before installing your graphics card, disconnect all power, peripheral, and telecommunications... |
15 |
| 2. To remove the Personal Workstation’s cover, refer to the User’s Guide that came with your Pers... |
15 |
| 3. Use a static-grounding strap, attaching it to the bare metal chassis of your Personal Workstat... |
15 |
| 4. Place the Workstation on its side on a flat work surface, such as a table top. |
15 |
| 5. Ensure that all cables are correctly routed and flat against the system so that they do not ob... |
15 |
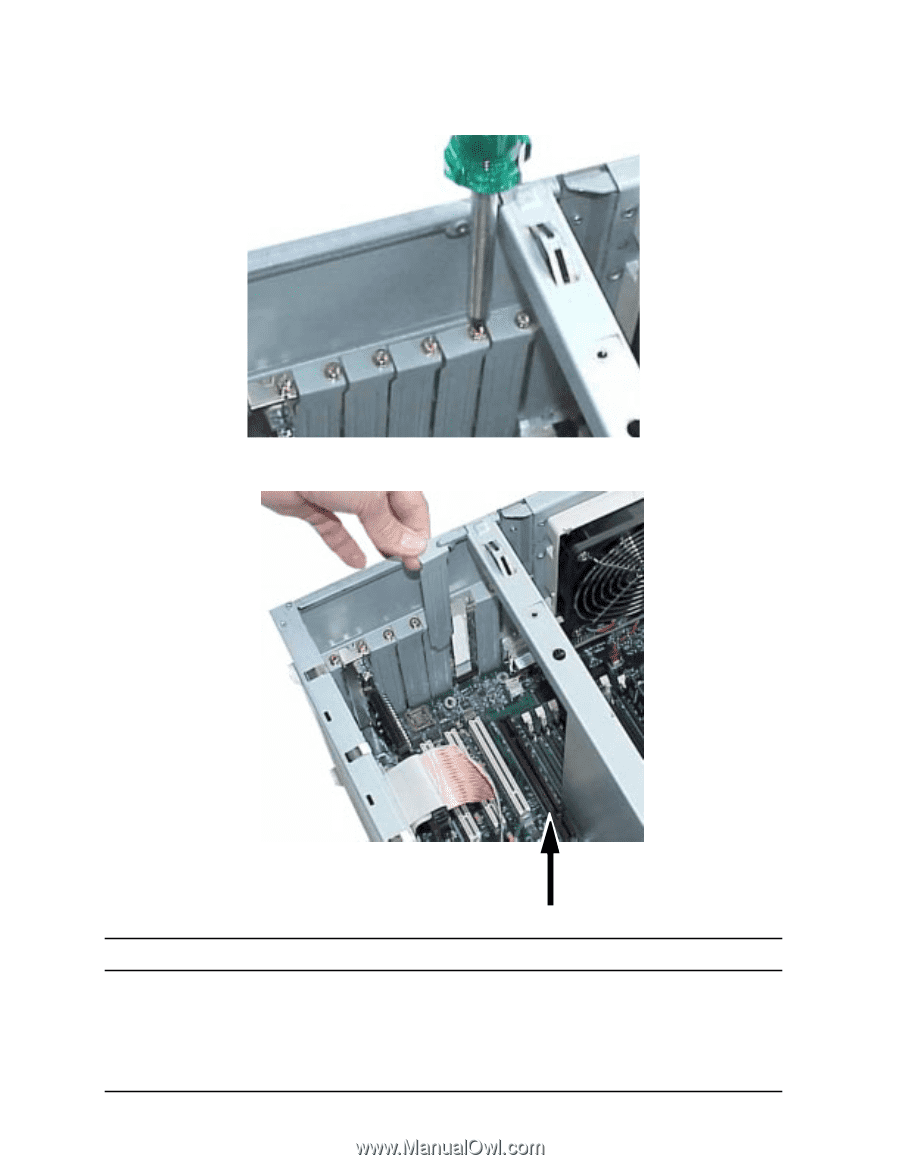
| 6. Remove the AGP accessory slot screw from the bulkhead. |
16 |
| 7. Remove the bulkhead filler panel from the AGP slot. |
16 |
| 8. Grasp the graphics card’s bulkhead and opposite edge and align the card’s contact fingers with... |
16 |
| 9. Press the ELSA graphics card firmly into place. |
17 |
| 10. Replace the bulkhead screw that secures the graphics card to the workstation chassis. |
17 |
| Updating the ELSA Graphics Driver |
18 |
| Updating the ELSA Graphics Driver |
18 |
| HP updates the ELSA graphics driver as needed to incorporate feature and performance enhancements... |
18 |
| You can download the latest version of the ELSA graphics driver from HP’s web site: |
18 |
| http://www.hp.com/go/visualizesupport |
18 |
| http://www.hp.com/go/visualizesupport |
18 |
| NOTE A README file is supplied with the driver. Please read it carefully as it provides instructi... |
18 |
| NOTE A README file is supplied with the driver. Please read it carefully as it provides instructi... |
18 |
| To update the driver, follow these instructions: |
18 |
| 1. Create a temporary directory such as |
18 |
| 1. Create a temporary directory such as |
18 |
| 2. Download the driver from HP’s web site to a temporary folder on your hard disk. |
18 |
| 3. Run the executable file to decompress the contained files. You can do this by double-clicking ... |
18 |
| Follow the instructions provided in the README file that comes with the driver. |
18 |
| Configuring the ELSA Graphics Driver |
18 |
| Configuring the ELSA Graphics Driver |
18 |
| See the README file that comes with the driver to obtain additional information. |
18 |
| Troubleshooting |
18 |
| Troubleshooting |
18 |
| The following is a list of known problems: |
18 |
| Generating Configuration Reports |
19 |
| Generating Configuration Reports |
19 |
| The ELSA Synergy II and GLoria II drivers can generate a report of the system and video configura... |
19 |
| A� Regulatory Information and Warranty |
21 |
| A� Regulatory Information and Warranty |
21 |
| Regulatory Information |
22 |
| Regulatory Information |
22 |
| <TABLE> |
22 |
| <TABLE HEADING> |
22 |
| <TABLE ROW> |
22 |
| Declaration of Conformity according to ISO/IEC Guide 22 and EN 45014 |
22 |
| Declaration of Conformity according to ISO/IEC Guide 22 and EN 45014 |
22 |
| <TABLE BODY> |
22 |
| <TABLE ROW> |
22 |
| Manufacturer:�������������������������Hewlett-Packard Company �����������������������������������... |
22 |
| Manufacturer |
22 |
| Manufacturer |
22 |
| Conforms to the following specifications: |
22 |
| Conforms to the following specifications: |
22 |
| Safety |
22 |
| Safety |
22 |
| Safety |
22 |
| IEC 950:1991+A1+A2+A3+A4 / EN 60950:1992+A1+A2+A3+A4 |
22 |
| EMC |
22 |
| EMC |
22 |
| Emissions - EN 55022: 1995 Class B |
22 |
| Emissions - EN 55022: 1995 Class B |
22 |
| US FCC Part 15, Class B |
22 |
| Immunity - EN50082-1: 1992 |
22 |
| Additionally, product complies with: |
22 |
| Additionally, product complies with: |
22 |
| EN 61000-4-2: 1995 - 4kV CD, 8 kV AD |
22 |
| EN 61000-4-2: 1995 - 4kV CD, 8 kV AD |
22 |
| and is certified by: |
22 |
| and is certified by: |
22 |
| and is certified by: |
22 |
| and is certified by: |
22 |
| ELSA AG, Aachen, GERMANY (Original Equipment Manufacturer) |
22 |
| Supplementary information: |
22 |
| Supplementary information: |
22 |
| For Compliance Information ONLY, contact: |
22 |
| For Compliance Information ONLY, contact: |
22 |
| European Contact: |
22 |
| European Contact: |
22 |
| European Contact: |
22 |
| Your local Hewlett-Packard Sales and Service Office or Hewlett-Packard GmbH, Department HQ-TRE St... |
22 |
| Americas Contact: |
22 |
| Americas Contact: |
22 |
| Hewlett-Packard, Fort Collins Site Quality Manager, mail stop 64 , 3404 E. Harmony Rd., Fort Coll... |
22 |
| FCC |
23 |
| FCC |
23 |
| This equipment has been tested and found to comply with the limits for a Class B digital device, ... |
23 |
| If this equipment does cause harmful interference to radio or television reception, which can be ... |
23 |
| HP Hardware Warranty |
24 |
| HP Hardware Warranty |
24 |
| Important: This is your hardware product warranty statement. Please, read it carefully. |
24 |
| HP Year 2000 Warranty |
24 |
| HP Year 2000 Warranty |
24 |
| This HP Year 2000 Warranty is in addition to the HP Standard Commercial Warranties contained in E... |
24 |
| If the Specifications require that specific HP Products must perform as a system in accordance wi... |
24 |
| Three Year Limited Hardware Warranty |
24 |
| Three Year Limited Hardware Warranty |
24 |
| Hewlett-Packard (HP) warrants this hardware product against defects in materials and workmanship ... |
24 |
| Limitation of Warranty |
25 |
| Limitation of Warranty |
25 |
| The above warranty shall not apply to defects resulting from: misuse; unauthorized modification; ... |
25 |
| Limitation of Liability and Remedies |
25 |
| Limitation of Liability and Remedies |
25 |
| THE REMEDIES PROVIDED ABOVE ARE THE CUSTOMER'S SOLE AND EXCLUSIVE REMEDIES. IN NO EVENT SHALL HP ... |
25 |
| Obtaining On-Site Warranty Service |
26 |
| Obtaining On-Site Warranty Service |
26 |
| To obtain on-site warranty service, the customer must contact an HP Sales and Service Office (in ... |
26 |
| During the on-site warranty period, customer-replaceable components may be serviced through exped... |
26 |
| Customer Responsibilities |
26 |
| Customer Responsibilities |
26 |
| The customer may be required to run HP-supplied diagnostic programs before an on-site visit or re... |
26 |
| Obtaining Parts Warranty Service |
27 |
| Obtaining Parts Warranty Service |
27 |
| When parts warranty service applies, the customer may be required to run HP-supplied diagnostic p... |
27 |
| HP Telephone Support Services |
27 |
| HP Telephone Support Services |
27 |
| HP Free telephone support for your Personal Workstation is available during the first year from d... |
27 |
| (Rev. 17/03/98) |
27 |
| HP Software Product License Agreement and Software Product Limited Warranty |
27 |
| HP Software Product License Agreement and Software Product Limited Warranty |
27 |
| Your HP Visualize Personal Workstation contains preinstalled software programs. Please read the S... |
27 |
| CAREFULLY READ THIS LICENSE AGREEMENT AND LIMITED WARRANTY STATEMENT BEFORE PROCEEDING TO OPERATE... |
27 |
| PROCEEDING WITH CONFIGURATION SIGNIFIES YOUR ACCEPTANCE OF THE LICENSE TERMS. |
28 |
| HP Software Product License Agreement |
28 |
| HP Software Product License Agreement |
28 |
| UNLESS OTHERWISE STATED BELOW, THIS HP SOFTWARE PRODUCT LICENSE AGREEMENT SHALL GOVERN THE USE OF... |
28 |
| Note: Operating System Software by Microsoft is licensed to you under the Microsoft End User Lice... |
28 |
| The following License Terms govern the use of the software: |
28 |
| USE. Customer may use the software on any one computer. Customer may not network the software or ... |
28 |
| COPIES AND ADAPTATIONS. Customer may make copies or adaptations of the software (a) for archival ... |
28 |
| OWNERSHIP. Customer agrees that he/she does not have any title or ownership of the software, othe... |
28 |
| PRODUCT RECOVERY CD-ROM. If your computer was shipped with a product recovery CD-ROM: (i) The pro... |
28 |
| TRANSFER OF RIGHTS IN SOFTWARE. Customer may transfer rights in the software to a third party onl... |
28 |
| SUBLICENSING AND DISTRIBUTION. Customer may not lease, sublicense the software or distribute copi... |
28 |
| TERMINATION. Hewlett-Packard may terminate this software license for failure to comply with any o... |
28 |
| UPDATES AND UPGRADES. Customer agrees that the software does not include updates and upgrades whi... |
29 |
| EXPORT CLAUSE. Customer agrees not to export or re-export the software or any copy or adaptation ... |
29 |
| U.S. GOVERNMENT RESTRICTED RIGHTS. Use, duplication, or disclosure by the U.S. Government is subj... |
29 |
| HP Software Product Limited Warranty |
29 |
| HP Software Product Limited Warranty |
29 |
| THIS HP SOFTWARE PRODUCT LIMITED WARRANTY SHALL COVER ALL SOFTWARE THAT IS PROVIDED TO YOU, THE C... |
29 |
| Ninety-Day Limited Software Warranty. HP warrants for a period of NINETY (90) DAYS from the date ... |
29 |
| Removable Media (If supplied). HP warrants the removable media, if supplied, upon which this prod... |
29 |
| Notice of Warranty Claims. Customer must notify HP in writing of any warranty claim not later tha... |
29 |
| Limitation of Warranty. HP makes no other express warranty, whether written or oral with respect ... |
29 |
| Limitation of Liability and Remedies. THE REMEDIES PROVIDED ABOVE ARE CUSTOMER’S SOLE AND EXCLUSI... |
30 |
| Obtaining Warranty Service. Warranty service may be obtained from the nearest HP sales office or ... |
30 |
| Consumer transactions in Australia and the United Kingdom: The disclaimers and limitations above ... |
30 |

 1
1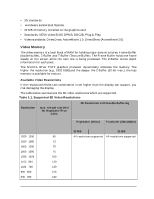 11
11 12
12 13
13 14
14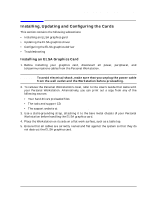 15
15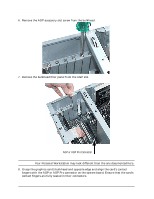 16
16 17
17 18
18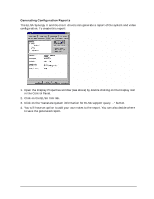 19
19 20
20 21
21