HP XM600 hp kayak xm600 series 2, service handbook for desktop models - Page 24
Appendices B Recovery Boot Active Procedures, HP Kayak XU800 PC Workstation BIOS Recovery
 |
View all HP XM600 manuals
Add to My Manuals
Save this manual to your list of manuals |
Page 24 highlights
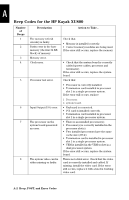
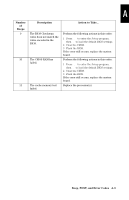
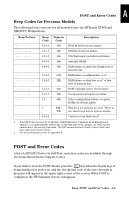
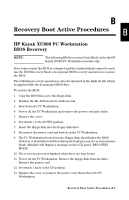
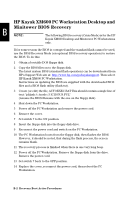
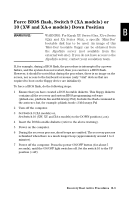
B Recovery Boot Active Procedures B HP Kayak XU800 PC Workstation BIOS Recovery NOTE: The following BIOS recovery (Crisis Mode) is for the HP Kayak XU800 PC Workstation models only. If for some reason the BIOS is corrupted and the standard flash cannot be used, use the BIOS Recovery Mode (exceptional BIOS recovery operation) to restore the BIOS. The following recovery operation is also documented in the flash.txt file which is supplied with the downloaded BIOS files. To restore the BIOS: 1 Copy the BIOS files on to the floppy disk. 2 Rename the file AI11xx.rom to amiboot.rom. 3 Shut down the PC Workstation. 4 Power off the PC Workstation and remove the power cord and cables. 5 Remove the cover. 6 Set switch 1 to the DOWN position. 7 Insert the floppy disk into the floppy disk drive. 8 Reconnect the power cord and switch on the PC Workstation. 9 The PC Workstation boots from the floppy disk, then flashes the BIOS. However, it should be noted that during the flash process, the screen remains blank. MaxiLife will display a message on the LCD panel "RECOVERY MODE". 10 The recovery process is finished when there are four beeps. 11 Power off the PC Workstation. Remove the floppy disk from the drive. Remove the power cord. 12 Set switch 1 back to the UP position. 13 Replace the cover, reconnect the power cord, then reboot the PC Workstation. Recovery Boot Active Procedures B-1
-
 1
1 -
2
-
3
-
4
-
5
-
6
-
7
-
8
-
9
-
10
-
11
-
12
-
13
-
14
-
15
-
16
-
17
-
18
-
 19
19 -
 20
20 -
 21
21 -
 22
22 -
 23
23 -
 24
24 -
 25
25 -
 26
26 -
 27
27
 |
 |