HP Xw460c NVIDIA Quadro FX 1600M installation - Page 7
Step 5 — Re-install the blade workstation, Step 6 — Install the graphics driver, Windows XP, RHEL4
 |
View all HP Xw460c manuals
Add to My Manuals
Save this manual to your list of manuals |
Page 7 highlights
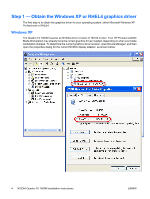
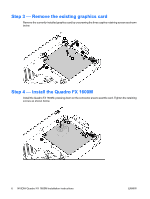
Step 5 - Re-install the blade workstation 1. Install the blade workstation access panel 2. Install the blade workstation in the rack NOTE: To install the graphics driver, HP recommends either using the iLO 2 remote console, or connecting a keyboard, mouse and monitor to the Local I/O Connector. In either case, the blade workstation Remote Console Mode should be set to Setup Mode, as described in the Administrator's Guide for your operating system. Setup Mode is selected during booting of the blade workstation. 3. Power up the blade workstation, and select Setup Mode during the boot process. On Linux, Setup Mode may already be selected. Step 6 - Install the graphics driver ● Windows XP: To install the graphics driver, use Windows Explorer to navigate to where the driver softpaq is saved. Double-click on the softpaq and follow the installation instructions. After installation is complete, reboot the blade workstation, and set Remote Console Mode to User Mode. ● RHEL4: To install the graphics driver, navigate to where the driver rpm is saved. As "root" install the rpm using the command "%: rpm -Uvh ". Using the option "-Uvh" will install the rpm or upgrade an existing rpm. After installation is complete, reboot the blade workstation, keeping Remote Console Mode set to Setup Mode (which is the mode used by Linux). Step 7 - Verify RGS access to the blade workstation At this point, the blade workstation should be accessible using RGS from a client computer. Follow your normal RGS connection process to verify that an RGS connection can be made to the blade workstation. ENWW Step 5 - Re-install the blade workstation 7
-
 1
1 -
 2
2 -
 3
3 -
 4
4 -
 5
5 -
 6
6 -
 7
7 -
 8
8
 |
 |