HP Xw6200 HP xw and Z Series Workstations - Installing an HP Solenoid Lock and - Page 4
Installing an HP Solenoid Lock and Hood Sensor, - failsafe key
 |
UPC - 882780333536
View all HP Xw6200 manuals
Add to My Manuals
Save this manual to your list of manuals |
Page 4 highlights
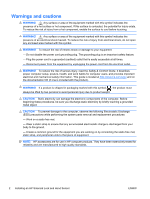
The attachment point for the Solenoid Lock may be located on the back panel or the top panel of the computer chassis. 1. Ensure that the security pin in the Solenoid Lock assembly is in the OFF position, as illustrated. If the pin is up, push it down to the OFF position. Figure 2 Security pin in the OFF position 2. Install the new lock assembly (1) on the inside of the rear panel or top panel of the computer using the two tamper-resistant screws (2) and the FailSafe Key included in this kit. NOTE: On some computer models, the Solenoid Lock may look different than the one pictured, or may be installed on the other side of the system fan grill or on the top panel of the computer. 3. Plug the loose end of the Solenoid Lock cable into the appropriate connector on the system board (3). Be sure to route the cable so it is not interfering with other system board connectors or computer components. NOTE: To locate system components on HP Workstations, see the service label on the side access panel. On some HP Workstations, such as the HP Z600 Workstation series, the Solenoid Lock cable does not connect to the system board. Figure 3 Installing the Solenoid Lock assembly 4 Installing an HP Solenoid Lock and Hood Sensor ENWW
-
 1
1 -
 2
2 -
 3
3 -
 4
4 -
 5
5 -
 6
6
 |
 |
