HP Xw6600 HP xw and Z Series Workstations - LSI 8888 8-port SAS RAID Controlle - Page 9
Standard data cable connections
 |
UPC - 883585731121
View all HP Xw6600 manuals
Add to My Manuals
Save this manual to your list of manuals |
Page 9 highlights
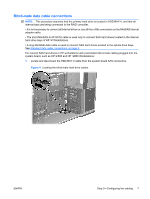
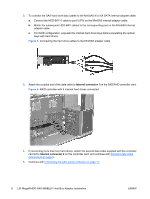
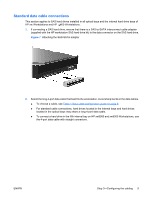
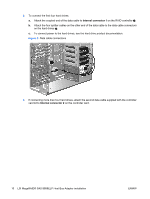
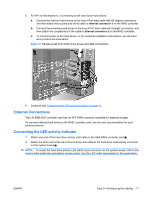
Standard data cable connections This section applies to SAS hard drives installed in all optical bays and the internal hard drive bays of HP xw Workstations and HP 400 Workstations. 1. If connecting a SAS hard drive, ensure that there is a SAS-to-SATA interconnect cable adapter (supplied with the HP workstation SAS hard drive kit) to the data connector on the SAS hard drive. Figure 7 Attaching the SAS-SATA adapter 2. Select the long 4-port data cable that best fits the workstation. Avoid sharp bends in the data cables. ● To choose a cable, see Table 1 Data cable configuration guide on page 5. ● For standard cable connections, hard drives located in the internal bays and hard drives located in the optical bays may share a long 4-port data cable. ● To connect a hard drive in the fifth internal bay on HP xw8000 and xw9000 Workstations, use the 4-port data cable with straight connectors. ENWW Step 3-Configuring the cabling 9
-
 1
1 -
2
-
3
-
 4
4 -
 5
5 -
 6
6 -
 7
7 -
 8
8 -
 9
9 -
 10
10 -
 11
11 -
 12
12 -
 13
13
 |
 |
