HP Xw8400 Fixed Rack Kit Installation - Page 3
Prepare the Rack, Compaq Rack, HP Series-E rack, Rack with pre-threaded columns
 |
UPC - 883585271085
View all HP Xw8400 manuals
Add to My Manuals
Save this manual to your list of manuals |
Page 3 highlights
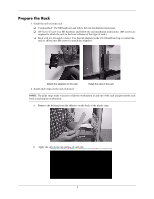
Prepare the Rack 1. Install the rails on your rack. ❏ Compaq Rack: Use M6 hardware and follow the rail installation instructions. ❏ HP Series-E rack: Use M5 hardware and follow the rail installation instructions. (M6 screws are required to attach the rails to the front columns of this type of rack.) ❏ Rack with pre-threaded columns: Use the rail adapters in the 10-32 hardware bag to convert the rails as shown (use M6 screws to attach the adapters): Attach the adapters to the rails 2. Install glide strips on the rails if desired. Install the rails in the rack NOTE: The glide strips make it easier to slide the workstation in and out of the rack and prevent the rails from scratching the workstation. a. Remove the backing from the adhesive on the back of the plastic strip. b. Apply the strip to the top surface of each rail. 3
-
 1
1 -
 2
2 -
 3
3 -
 4
4 -
 5
5 -
 6
6 -
 7
7 -
 8
8 -
 9
9 -
10
-
11
-
12
-
13
-
14
-
15
-
16
 |
 |
