HP Xw8400 Fixed Rack Kit Installation - Page 5
attaching the side cover to the rear of the chassis. Then push the side cover toward the top of
 |
UPC - 883585271085
View all HP Xw8400 manuals
Add to My Manuals
Save this manual to your list of manuals |
Page 5 highlights
4. Pull the release and slide the foot toward the front of the chassis, then lift it off. 5. Using a screwdriver, push gently through the opening on the top of the chassis to release the top panel. Top of chassis 6. While continuing to push the release button, grasp the top panel and slide it toward the back of the system. 7. Lift the plastic panel off of the system chassis. Slide panel back Lift panel NOTE: If the top cover is difficult to remove, remove the right side cover by removing the two screws attaching the side cover to the rear of the chassis. Then push the side cover toward the top of the workstation. Be sure to replace the right side cover and front bezel after removing the top cover. 5
-
 1
1 -
 2
2 -
 3
3 -
 4
4 -
 5
5 -
 6
6 -
 7
7 -
 8
8 -
 9
9 -
 10
10 -
 11
11 -
12
-
13
-
14
-
15
-
16
 |
 |

5
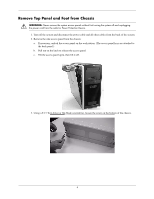
4.
Pull the release and slide the foot toward the front of the chassis, then lift it off.
5.
Using a screwdriver, push gently through the opening on the top of the chassis to release the top panel.
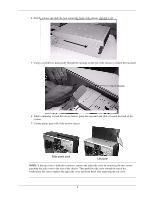
6.
While continuing to push the release button, grasp the top panel and slide it toward the back of the
system.
7.
Lift the plastic panel off of the system chassis.
NOTE:
If the top cover is difficult to remove, remove the right side cover by removing the two screws
attaching the side cover to the rear of the chassis. Then push the side cover toward the top of the
workstation. Be sure to replace the right side cover and front bezel after removing the top cover.
Top of chassis
Slide panel back
Lift panel