HP Xw8400 Fixed Rack Kit Installation - Page 6
Attach Rack Mounting Brackets to Workstation Chassis, Attach the left bracket
 |
UPC - 883585271085
View all HP Xw8400 manuals
Add to My Manuals
Save this manual to your list of manuals |
Page 6 highlights
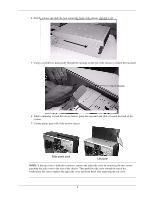
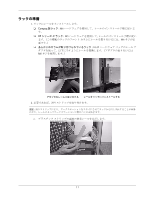
8. Replace the side access panel: a. Lower the access panel onto the chassis (aligning the guide rail on the bottom inside edge of the access panel with the bottom edge of the workstation chassis). b. Close the access panel, ensuring that the guides on the top of the access panel slide into the rails at the top of the chassis. Align guide rail with bottom edge of chassis 9. If desired, lock the access panel using the key provided. Attach Rack Mounting Brackets to Workstation Chassis 1. Lay the workstation on its side with the top of the chassis on your right and the bottom on your left. 2. Attach the left bracket: a. Align the left bracket with the screw holes on the left side (bottom) of the chassis. b. Use a Phillips screwdriver and two M4 flathead screws to attach the bracket. c. Attach the right bracket using the same procedure. Left bracket Right bracket 6
-
 1
1 -
 2
2 -
 3
3 -
 4
4 -
 5
5 -
 6
6 -
 7
7 -
 8
8 -
 9
9 -
 10
10 -
 11
11 -
 12
12 -
13
-
14
-
15
-
16
 |
 |
