HP Xw9300 Fixed Rack Kit Installation - Page 8
Attach the bracket to the rack using the appropriate hardware for your rack.
 |
View all HP Xw9300 manuals
Add to My Manuals
Save this manual to your list of manuals |
Page 8 highlights
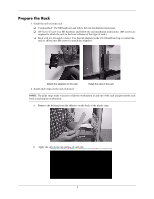
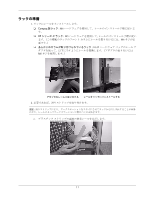
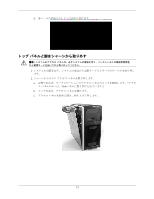
2. Secure the workstation onto the rack. Perform these steps on both sides of the workstation: On an HP or Compaq rack: a. Attach M5 or M6 clipnuts as shown: Trim clipnut Bracket clipnut b. Attach the bracket to the rack using the appropriate hardware for your rack. Mounting screws NOTE: On a rack with pre-threaded columns, the screws attach directly to the column. 3. Attach the trim piece and warning label to the rack above the workstation. Å WARNING: This warning label includes instructions for safely removing the workstation from the rack. This information is intended to prevent damage to the workstation and injury to personnel. 4. Attach cables and power. © 2004 Hewlett-Packard Development Company, L.P. The HP Invent logo is a registered trademark of Hewlett-Packard Development Company, L.P. 313349-002 8
-
 1
1 -
2
-
 3
3 -
 4
4 -
 5
5 -
 6
6 -
 7
7 -
 8
8 -
 9
9 -
 10
10 -
 11
11 -
 12
12 -
 13
13 -
14
-
15
-
16
 |
 |
