HP Xw9300 Setting Up SATA RAID on the HP xw9300 - Page 2
Introduction, Steps, Install Drives, Enable RAID, Con the RAID Volume
 |
View all HP Xw9300 manuals
Add to My Manuals
Save this manual to your list of manuals |
Page 2 highlights
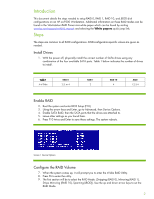
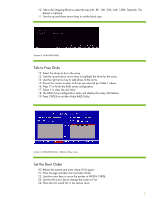
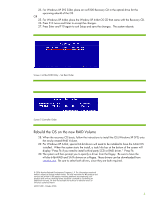
Introduction This document details the steps needed to setup RAID 0, RAID 1, RAID 10, and JBOD disk configurations on an HP xw9300 Workstation. Additional information on these RAID modes can be found in the Workstation RAID Primer mini-white paper which can be found by visiting www.hp.com/support/xw9300_manuals and selecting the White papers quick jump link. Steps The steps are common to all RAID configurations. RAID-configuration-specific values are given as needed. Install Drives 1. With the power off, physically install the correct number of SATA drives using any combination of the four available SATA ports. Table 1 below indicates the number of drives to install. Table 1 # of Disks RAID 0 2,3, or 4 RAID 1 2 RAID 10 4 JBOD 1,2,3,4 Enable RAID 2. Boot the system and enter BIOS Setup (F10). 3. Using the arrow keys and Enter, go to Advanced, then Device Options. 4. Enable SATA RAID, then the SATA ports that the drives are attached to. 5. Leave other settings as you found them. 6. Press F10 twice and Enter to save these settings. The system reboots. Screen 1 Device Options Configure the RAID Volume 7. When the system comes up, it will prompt you to enter the nVidia RAID Utility. 8. Press F6 to enter the utility. 9. The first section will be to select the RAID Mode: [Stripping (RAID 0), Mirroring (RAID 1), Stripe Mirroring (RAID 10), Spanning (JBOD]). Use the up and down arrow keys to set the RAID Mode. 2
-
 1
1 -
 2
2 -
 3
3 -
 4
4
 |
 |
