HP Xw9300 Setting Up SATA RAID on the HP xw9300 - Page 4
Rebuild the OS on the new RAID Volume, For Windows XP 64bit - sata drivers
 |
View all HP Xw9300 manuals
Add to My Manuals
Save this manual to your list of manuals |
Page 4 highlights
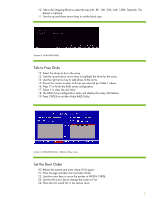
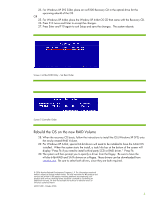
25. For Windows XP SP2 32bit, place an xw9300 Recovery CD in the optical drive for the upcoming rebuild of the OS. OR 25. For Windows XP 64bit, place the Window XP 64bit OS CD that came with the Recovery CD. 26. Press F10 twice and Enter to accept the changes. 27. Press Enter and F10 again to exit Setup and save the changes. The system reboots. Screen 4 nVidia RAID Utility - Set Boot Order Screen 5 Controller Order Rebuild the OS on the new RAID Volume 28. When the recovery CD boots, follow the instructions to install the OS (Windows XP SP2) onto the newly-created RAID Volume. 29. For Windows XP 64-bit, special 64-bit drivers will need to be installed to have the 64-bit OS installed. When the system starts the install, a task/info bar at the bottom of the screen will display "Press F6 if you need to install a third party SCSI or RAID driver." Press F6. 30. The system will then prompt you to specify a driver from the floppy. Be sure to have the nVidia 64bit RAID and SATA drivers on a floppy. These drivers can be downloaded from www.hp.com. Be sure to select both drivers, since they are both required. © 2006 Hewlett-Packard Development Company, L.P. The information contained herein is subject to change without notice. The only warranties for HP products and services are set forth in the express warranty statements accompanying such products and services. Nothing herein should be construed as constituting an additional warranty. HP shall not be liable for technical or editorial errors or omissions contained herein. 439274-001, October 2006 4
-
 1
1 -
 2
2 -
 3
3 -
 4
4
 |
 |
