HP Z210 HP Z200, Z400 and xw4000 Workstations - Rack Mount Tray Installation - Page 9
Rack considerations
 |
View all HP Z210 manuals
Add to My Manuals
Save this manual to your list of manuals |
Page 9 highlights
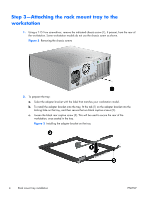
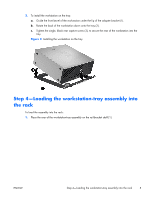
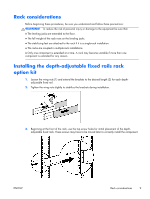
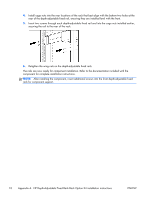
Rack considerations Before beginning these procedures, be sure you understand and follow these precautions: WARNING! To reduce the risk of personal injury or damage to the equipment be sure that: ● The leveling jacks are extended to the floor. ● The full weight of the rack rests on the leveling jacks. ● The stabilizing feet are attached to the rack if it is a single-rack installation. ● The racks are coupled in multiple-rack installations. ● Only one component is extended at a time. A rack may become unstable if more than one component is extended for any reason. Installing the depth-adjustable fixed rails rack option kit 1. Loosen the wing nuts (1) and extend the brackets to the desired length (2) for each depthadjustable fixed rail. 2. Tighten the wing nuts slightly to stabilize the brackets during installation. 3. Beginning at the front of the rack, use the top screw holes for initial placement of the depthadjustable fixed rails. These screws may have to be moved later to correctly install the component. ENWW Rack considerations 9
-
 1
1 -
2
-
3
-
 4
4 -
 5
5 -
 6
6 -
 7
7 -
 8
8 -
 9
9 -
 10
10
 |
 |