HP Z600 HP Z Series Workstations - Diskette drive installation - Page 4
HP Z600 - Workstation - 6 GB RAM Manual
 |
UPC - 884962074053
View all HP Z600 manuals
Add to My Manuals
Save this manual to your list of manuals |
Page 4 highlights
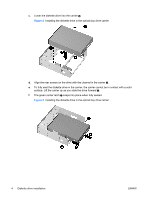
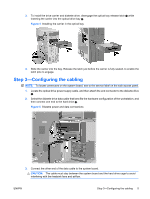
c. Lower the diskette drive into the carrier 2. Figure 2 Installing the diskette drive in the optical bay drive carrier d. Align the rear screws on the drive with the channel in the carrier . e. To fully seat the diskette drive in the carrier, the carrier cannot be in contact with a solid surface. Lift the carrier up as you slide the drive forward . f. The green carrier latch snaps into place when fully seated. Figure 3 Installing the diskette drive in the optical bay drive carrier 4 Diskette drive installation ENWW
-
 1
1 -
 2
2 -
 3
3 -
 4
4 -
 5
5 -
 6
6
 |
 |

c.
Lower the diskette drive into the carrier
2
.
Figure 2
Installing the diskette drive in the optical bay drive carrier
d.
Align the rear screws on the drive with the channel in the carrier
.
e.
To fully seat the diskette drive in the carrier, the carrier cannot be in contact with a solid
surface. Lift the carrier up as you slide the drive forward
.
f.
The green carrier latch
snaps into place when fully seated.
Figure 3
Installing the diskette drive in the optical bay drive carrier
4
Diskette drive installation
ENWW