HP Z600 HP Z Series Workstations - Diskette drive installation - Page 5
Step 3-Configuring the cabling
 |
UPC - 884962074053
View all HP Z600 manuals
Add to My Manuals
Save this manual to your list of manuals |
Page 5 highlights
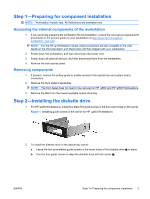
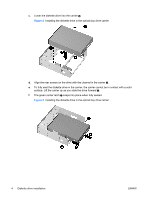
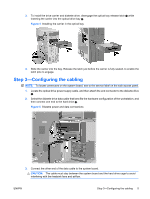
3. To install the drive carrier and diskette drive, disengage the optical bay release latch while inserting the carrier into the optical drive bay 2. Figure 4 Installing the carrier in the optical bay 4. Slide the carrier into the bay. Release the latch just before the carrier is fully seated, to enable the latch pins to engage. Step 3-Configuring the cabling NOTE: To locate connectors on the system board, see to the service label on the side access panel. 1. Locate the optical drive power supply cable, and then attach the end connector to the diskette drive . 2. Select the diskette drive data cable that best fits the hardware configuration of the workstation, and then connect one end to the hard drive 2. Figure 5 Diskette power and data connections 3. Connect the other end of the data cable to the system board. CAUTION: The cable must stay between the system board and the hard drive cage to avoid interfering with the heatsink fans and airflow. ENWW Step 3-Configuring the cabling 5
-
 1
1 -
 2
2 -
 3
3 -
 4
4 -
 5
5 -
 6
6
 |
 |
