HP dc72 HP Blade Workstation Client series - Embedded OS Version 8.xx - Page 35
Installing the embedded OS, Downloading the embedded OS from HP
 |
View all HP dc72 manuals
Add to My Manuals
Save this manual to your list of manuals |
Page 35 highlights
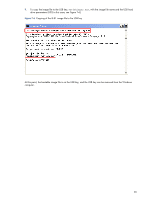
7 Installing the embedded OS The embedded OS that is preinstalled on the client cannot be customized-to update or install the embedded OS, you'll need to flash the entire IDE DOM drive. There are two ways to do this: • Download the embedded OS from www.hp.com, store it on a USB key, and install the client image from the USB key. This process is described in detail in the next two sections. • Download the embedded OS from www.hp.com, and use Altiris Deployment Solution to deploy the image to one or more client computers. See Section 1-6, "Altiris Deployment Solution documentation," for information about using this tool. IMPORTANT: Performing an update to change the software revision backwards from 8.xx to 7.xx is not supported. Likewise, performing an update to change the software revision from 8.81 to 8.62 is not supported. To determine the current embedded OS version, click the Webmin Custom Commands icon, and then click Query Version. If you need to revert from embedded OS 8.xx to 7.xx, or from 8.81 to 8.62, the entire DOM needs to cleared first. This can be performed using the following dd command: dd if=/dev/zero of=/dev/hda bs=512K CAUTION: All contents of the client computer DOM will be deleted during the process of installing the embedded OS. 7-1 Downloading the embedded OS from HP Perform the following steps on a Windows computer to download the embedded OS image, and store the image on a USB key: 1. Based on your client computer, go to one of the following websites: • HP Compaq Blade Workstation Client: http://www.hp.com/support/bwclient • HP dc72 Blade Workstation Client: http://www.hp.com/support/dc72 2. Click Download drivers and software. 3. Click Workstation Blade Client Embedded OS, select the desired "USB Key" image (see Figure 7-1), and click Download. Figure 7-1 Selection of the 8.81 USB key image 4. You'll be prompted to either Run or Save the softpaq file-click Save, and specify a location. 35
-
 1
1 -
2
-
3
-
4
-
5
-
6
-
7
-
8
-
9
-
10
-
11
-
12
-
13
-
14
-
15
-
16
-
17
-
18
-
19
-
20
-
21
-
22
-
23
-
24
-
25
-
26
-
27
-
28
-
29
-
 30
30 -
 31
31 -
 32
32 -
 33
33 -
 34
34 -
 35
35 -
 36
36 -
 37
37 -
 38
38 -
 39
39 -
 40
40 -
41
-
42
-
43
-
44
-
45
-
46
-
47
-
48
-
49
-
50
-
51
-
52
-
53
-
54
-
55
-
56
-
57
 |
 |
