HP dx6050 HP Business Desktop d300 and dx6050 Series Personal Computers Servic - Page 124
Position the guide screws on the drive into the J-slots in the drive bay, Then, slide the drive
 |
View all HP dx6050 manuals
Add to My Manuals
Save this manual to your list of manuals |
Page 124 highlights
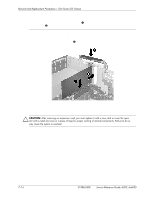
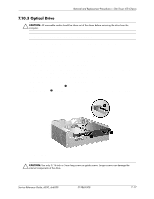
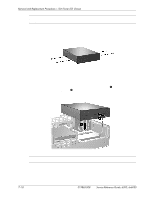
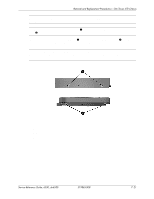
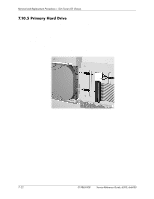
Removal and Replacement Procedures- Slim Tower (ST) Chassis ✎ When replacing the drive, transfer the four screws from the old drive to the new one. The screws take the place of drive rails. 2. Position the guide screws on the drive into the J-slots in the drive bay 1. Then, slide the drive towards the rear of the computer 2. ✎ The drive release latch automatically locks in place when installing a drive. 7-18 319865-008 Service Reference Guide, d300, dx6050
-
 1
1 -
2
-
3
-
4
-
5
-
6
-
7
-
8
-
9
-
10
-
11
-
12
-
13
-
14
-
15
-
16
-
17
-
18
-
19
-
20
-
21
-
22
-
23
-
24
-
25
-
26
-
27
-
28
-
29
-
30
-
31
-
32
-
33
-
34
-
35
-
36
-
37
-
38
-
39
-
40
-
41
-
42
-
43
-
44
-
45
-
46
-
47
-
48
-
49
-
50
-
51
-
52
-
53
-
54
-
55
-
56
-
57
-
58
-
59
-
60
-
61
-
62
-
63
-
64
-
65
-
66
-
67
-
68
-
69
-
70
-
71
-
72
-
73
-
74
-
75
-
76
-
77
-
78
-
79
-
80
-
81
-
82
-
83
-
84
-
85
-
86
-
87
-
88
-
89
-
90
-
91
-
92
-
93
-
94
-
95
-
96
-
97
-
98
-
99
-
100
-
101
-
102
-
103
-
104
-
105
-
106
-
107
-
108
-
109
-
110
-
111
-
112
-
113
-
114
-
115
-
116
-
117
-
118
-
 119
119 -
 120
120 -
 121
121 -
 122
122 -
 123
123 -
 124
124 -
 125
125 -
 126
126 -
 127
127 -
 128
128 -
 129
129 -
130
-
131
-
132
-
133
-
134
-
135
-
136
-
137
-
138
-
139
-
140
-
141
-
142
-
143
-
144
-
145
-
146
-
147
-
148
-
149
-
150
-
151
-
152
-
153
-
154
-
155
-
156
-
157
-
158
-
159
-
160
-
161
-
162
-
163
-
164
-
165
-
166
-
167
-
168
-
169
-
170
-
171
-
172
-
173
-
174
-
175
-
176
-
177
-
178
-
179
-
180
-
181
-
182
-
183
-
184
-
185
-
186
-
187
-
188
-
189
-
190
-
191
-
192
-
193
-
194
-
195
-
196
-
197
-
198
-
199
-
200
-
201
-
202
-
203
-
204
-
205
-
206
-
207
-
208
-
209
-
210
-
211
-
212
-
213
-
214
-
215
-
216
-
217
-
218
-
219
-
220
-
221
-
222
-
223
-
224
-
225
-
226
-
227
-
228
-
229
-
230
-
231
-
232
-
233
-
234
-
235
-
236
-
237
-
238
 |
 |
7–18
319865-008
Service Reference Guide, d300, dx6050
Removal and Replacement Procedures— Slim Tower (ST) Chassis
When replacing the drive, transfer the four screws from the old drive to the new one. The screws
take the place of drive rails.
2.
Position the guide screws on the drive into the J-slots in the drive bay
1
. Then, slide the drive
towards the rear of the computer
2
.
The drive release latch automatically locks in place when installing a drive.