HP dx6100 HP Business Desktop dx6100 Series Personal Computers Service Referen - Page 140
Horizontally Oriented Expansion Card, 7.10.1 Expansion Card Cage, 7.10.2 PCI Expansion Card
 |
View all HP dx6100 manuals
Add to My Manuals
Save this manual to your list of manuals |
Page 140 highlights
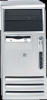
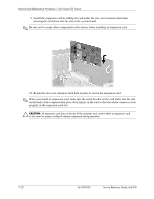
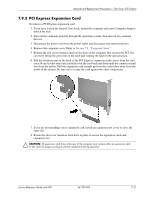
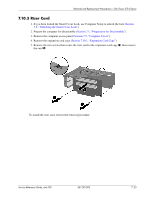
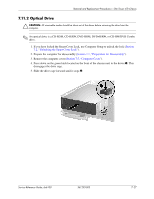
Removal and Replacement Procedures- Slim Tower (ST) Chassis 7.10 Horizontally Oriented Expansion Card This application is only available when the computer has the PCI Riser Card cage installed. Neither a PCI Express x1 or x16 card can be used in this application. 7.10.1 Expansion Card Cage 1. If you have locked the Smart Cover Lock, restart the computer and enter Computer Setup to unlock the lock. 2. Turn off the computer properly through the operating system, then turn off any external devices. 3. Disconnect the power cord from the power outlet and disconnect any external devices. 4. Remove the computer from the stand and lay the computer on its side. 5. Remove the computer cover. Refer to Section 7.5, "Computer Cover". 6. Lift the bail handle on the expansion card cage and pull the cage straight up and out of the computer. 7. Lay the card cage on its top for stability before doing any work on it. To install the card cage, reverse the installation process. 7.10.2 PCI Expansion Card 1. If you have locked the Smart Cover Lock, restart the computer and enter Computer Setup to unlock the lock. 2. Turn off the computer properly through the operating system, then turn off any external devices. 3. Disconnect the power cord from the power outlet and disconnect any external devices. 4. Remove the computer from the stand and lay the computer on its side. 5. Remove the computer cover. Refer to Section 7.5, "Computer Cover". 7-22 361293-003 Service Reference Guide, dx6100
-
 1
1 -
2
-
3
-
4
-
5
-
6
-
7
-
8
-
9
-
10
-
11
-
12
-
13
-
14
-
15
-
16
-
17
-
18
-
19
-
20
-
21
-
22
-
23
-
24
-
25
-
26
-
27
-
28
-
29
-
30
-
31
-
32
-
33
-
34
-
35
-
36
-
37
-
38
-
39
-
40
-
41
-
42
-
43
-
44
-
45
-
46
-
47
-
48
-
49
-
50
-
51
-
52
-
53
-
54
-
55
-
56
-
57
-
58
-
59
-
60
-
61
-
62
-
63
-
64
-
65
-
66
-
67
-
68
-
69
-
70
-
71
-
72
-
73
-
74
-
75
-
76
-
77
-
78
-
79
-
80
-
81
-
82
-
83
-
84
-
85
-
86
-
87
-
88
-
89
-
90
-
91
-
92
-
93
-
94
-
95
-
96
-
97
-
98
-
99
-
100
-
101
-
102
-
103
-
104
-
105
-
106
-
107
-
108
-
109
-
110
-
111
-
112
-
113
-
114
-
115
-
116
-
117
-
118
-
119
-
120
-
121
-
122
-
123
-
124
-
125
-
126
-
127
-
128
-
129
-
130
-
131
-
132
-
133
-
134
-
 135
135 -
 136
136 -
 137
137 -
 138
138 -
 139
139 -
 140
140 -
 141
141 -
 142
142 -
 143
143 -
 144
144 -
 145
145 -
146
-
147
-
148
-
149
-
150
-
151
-
152
-
153
-
154
-
155
-
156
-
157
-
158
-
159
-
160
-
161
-
162
-
163
-
164
-
165
-
166
-
167
-
168
-
169
-
170
-
171
-
172
-
173
-
174
-
175
-
176
-
177
-
178
-
179
-
180
-
181
-
182
-
183
-
184
-
185
-
186
-
187
-
188
-
189
-
190
-
191
-
192
-
193
-
194
-
195
-
196
-
197
-
198
-
199
-
200
-
201
-
202
-
203
-
204
-
205
-
206
-
207
-
208
-
209
-
210
-
211
-
212
-
213
-
214
-
215
-
216
-
217
-
218
-
219
-
220
-
221
-
222
-
223
-
224
-
225
-
226
-
227
-
228
-
229
-
230
-
231
-
232
-
233
-
234
-
235
-
236
-
237
-
238
-
239
-
240
-
241
-
242
-
243
-
244
-
245
-
246
-
247
-
248
-
249
-
250
 |
 |