HP nx9000 Maintenance and Service Guide - Page 41
Recovering the Factory Software - driver
 |
View all HP nx9000 manuals
Add to My Manuals
Save this manual to your list of manuals |
Page 41 highlights
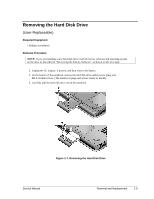
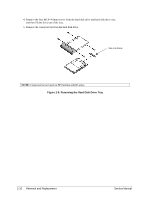
Recovering the Factory Software The following procedure describes how to recover the notebook's original operating system and drivers. This process can take up to 15 minutes to complete. (For more information about recovering the factory software installation, see the readme.txt file in the root directory of the Recovery CDs.) CAUTION: Do not interrupt the following process or unplug the AC adapter until the process completes. 1. Connect the AC adapter to the notebook. 2. Insert the Restore CD (or the Operating System) disk 1 into the notebook's CD/DVD drive. If the notebook is turned off, use a pin or straightened paper clip to press the release switch on the drive door to open it. 3. Turn on or restart the notebook. 4. When the HP logo appears, press esc to display the Boot menu. 5. Use the arrow keys to select the CD/DVD drive as the first boot device, and then press enter. 6. When the dialog box appears, follow the displayed instructions. If prompted, accept the recommended partition size. To create the Utility partition without installing the factory software, select Advanced, and then select not to install the operating system. If the hard disk is partitioned into several logical drives, you can install the factory software on drive C without affecting other drives. select Advanced and then select to restore only the C partition. 7. When prompted to reboot the notebook, press ctrl+alt+del, and then follow any instructions that appear. 8. When the operating system has been installed and while Windows is running, replace the OS CD with the Driver Recovery CD. If autorun is not enabled, select Start > Run. Then type D:\SWSETUP\APPINSTL\SETUP.EXE (assuming "D:" is your drive designation), and then press enter. 9. Follow the on-screen instructions for installing the drivers. 10. After the drivers have been installed, the application software may be installed. Service Manual Removal and Replacement 2-11
-
 1
1 -
2
-
3
-
4
-
5
-
6
-
7
-
8
-
9
-
10
-
11
-
12
-
13
-
14
-
15
-
16
-
17
-
18
-
19
-
20
-
21
-
22
-
23
-
24
-
25
-
26
-
27
-
28
-
29
-
30
-
31
-
32
-
33
-
34
-
35
-
 36
36 -
 37
37 -
 38
38 -
 39
39 -
 40
40 -
 41
41 -
 42
42 -
 43
43 -
 44
44 -
 45
45 -
 46
46 -
47
-
48
-
49
-
50
-
51
-
52
-
53
-
54
-
55
-
56
-
57
-
58
-
59
-
60
-
61
-
62
-
63
-
64
-
65
-
66
-
67
-
68
-
69
-
70
-
71
-
72
-
73
-
74
-
75
-
76
-
77
-
78
-
79
-
80
-
81
-
82
-
83
-
84
-
85
-
86
-
87
-
88
-
89
-
90
-
91
-
92
-
93
-
94
-
95
-
96
-
97
-
98
-
99
-
100
-
101
-
102
-
103
-
104
-
105
-
106
-
107
-
108
-
109
-
110
-
111
-
112
-
113
-
114
-
115
-
116
-
117
-
118
-
119
-
120
-
121
-
122
-
123
-
124
-
125
-
126
-
127
-
128
-
129
-
130
-
131
-
132
-
133
-
134
-
135
-
136
-
137
-
138
-
139
-
140
-
141
-
142
-
143
-
144
-
145
-
146
-
147
-
148
-
149
-
150
-
151
-
152
-
153
-
154
 |
 |