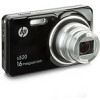
HP s520 HP s520 Digital Camera - User Manual - Page 28
DPOF Settings
 |
View all HP s520 manuals
Add to My Manuals
Save this manual to your list of manuals |
Page 28 highlights
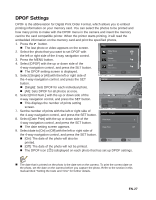
DPOF Settings DPOF is the abbreviation for Digital Print Order Format, which allows you to embed printing information on your memory card. You can select the photos to be printed and how many prints to make with the DPOF menu in the camera and insert the memory card to the card compatible printer. When the printer starts printing, it will read the embedded information on the memory card and print the specified photos. 1. Press the button. The last photo or video appears on the screen. 2. Select the photo that you want to set DPOF with the left or right side of the 4-way navigation control. 3. Press the MENU button. 4. Select [DPOF] with the up or down side of the 4-way navigation control, and press the SET button. The DPOF setting screen is displayed. MENU SET 5. Select [Single] or [All] with the left or right side of the 4-way navigation control, and press the SET button. [Single]: Sets DPOF for each individual photo. [All]: Sets DPOF for all photos at once. 6. Select [Print Num.] with the up or down side of the 4-way navigation control, and press the SET button. This displays the number of prints setting screen. MENU SET 7. Set the number of prints with the left or right side of the 4-way navigation control, and press the SET button. 8. Select [Date Print] with the up or down side of the 4-way navigation control, and press the SET button. The date setting screen appears. 9. Select date to [On] or [Off] with the left or right side of the 4-way navigation control, and press the SET button. [On]: The date of the photo will also be printed. MENU SET [Off]: The date of the photo will not be printed. The DPOF icon [ ] isdisplayed on each photo that has set up DPOF settings. The date that is printed on the photo is the date set on the camera. To print the correct date on the photo, set the date on the camera before you capture the photo. Refer to the section in this manual titled "Setting the Date and Time" for further details. EN-27
-
 1
1 -
2
-
3
-
4
-
5
-
6
-
7
-
8
-
9
-
10
-
11
-
12
-
13
-
14
-
15
-
16
-
17
-
18
-
19
-
20
-
21
-
22
-
 23
23 -
 24
24 -
 25
25 -
 26
26 -
 27
27 -
 28
28 -
 29
29 -
 30
30 -
 31
31 -
 32
32 -
 33
33 -
34
-
35
-
36
-
37
-
38
-
39
-
40
-
41
-
42
 |
 |
