Hisense 40H5500F Quick Start Guide - Page 14
Step 4. Power on the TV, Step 5. Complete the first-time setup, STEP 6. Establish a network
 |
View all Hisense 40H5500F manuals
Add to My Manuals
Save this manual to your list of manuals |
Page 14 highlights
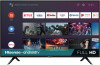
Step 4. Power on the TV Connect your power cord to the TV and plug it into a power outlet. Your TV will display a launch screen showing the Hisense logo. Power Cord Wall Outlet Step 5. Complete the first-time setup The first time you turn on your TV, there is a guided setup to make it easy to connect your TV to the Internet and complete the setup of your TV. STEP 6. Establish a network connection 1. Press the Home button on the remote control, and select the Settings to enter the Settings menu. 2. Select Network & Internet. External Modem (ADSL / VDSL / Cable TV) IP Sharer (Router) (with DHCP server) icon to select TV JACK LAN Modem Cable LAN Cable LAN Cable 12
-
 1
1 -
2
-
3
-
4
-
5
-
6
-
7
-
8
-
 9
9 -
 10
10 -
 11
11 -
 12
12 -
 13
13 -
 14
14 -
 15
15 -
 16
16 -
 17
17 -
 18
18 -
 19
19 -
20
 |
 |

12
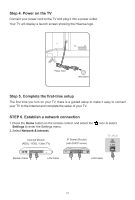
Step 4. Power on the TV
Connect your power cord to the TV and plug it into a power outlet.
Your TV will display a launch screen showing the Hisense logo.
Power Cord
Wall Outlet
Step 5. Complete the first-time setup
The first time you turn on your TV, there is a guided setup to make it easy to connect
your TV to the Internet and complete the setup of your TV.
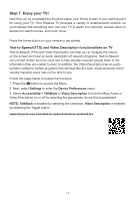
STEP 6. Establish a network connection
1. Press
the
Home
button
on the remote control,
and select the
icon to
select
Settings
to enter the Settings menu
.
2. Select
Network & Internet
.
TV JACK
Modem Cable
LAN Cable
LAN Cable
External Modem
(ADSL / VDSL / Cable TV)
IP Sharer (Router)
(with DHCP server)
LAN