Hitachi 42HDX99 Owners Guide - Page 4
First time use - tv
 |
View all Hitachi 42HDX99 manuals
Add to My Manuals
Save this manual to your list of manuals |
Page 4 highlights
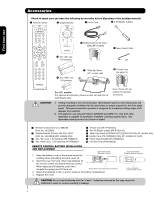
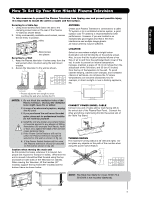
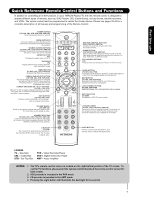
First time use Accessories Check to make sure you have the following accessories before disposing of the packing material. ³ Remote Control · Simple Remote ´ Power Cord ² 2 IR Blaster Cables CH + GUIDE VOL - SELECT VOL + MUTE CH - MENU EXIT FAV CH INPUTS º Ferrite Core on AC Cord POWER (Only 55" models) ¾ Power Swivel Cable + - » Two "AA" size, 1.5V batteries / ¿ Two "AAA" size, 1.5V batteries ¶ Table Top Stand (42" models only) µ 1 Ferrite Core (see page 14) For U.S. models: For optional accessories, please access our web site at: www.hitachi.us/tv Note: Please visit our website for optional accessories. CAUTION: 1. Ceiling mounting is not recommended. Mounting the panel on the ceiling does not provide adequate ventilation for the electronics or proper support for the front glass panel. This plasma television product is designed for a maximum tilting angle of 45 degrees from vertical. 2. This stand for use only with Hitachi 42HDX99 and 42HDT79. Use with other apparatus is capable of resulting in instability causing possible injury. See important marking located on bottom of stand. ³ Remote Control Unit CLU-3861WL (Part No. HL02069). · Simple Remote Control Unit CLU-123S (Part No. HL01864)(HDX models only). » Two "AA" size, 1.5V batteries (P# FQ00021). ¿ Two "AAA" size, 1.5V batteries (P# FR00061) ´ Power Cord (P# EV01841). ² Two IR Blaster cables (P# EY01641). ¶ Table Top Stand (QJ02681 HDT) (QJ02673 HDX) 42" models only. º Ferrite Core (P# GX00666) (Only 55" models AC Cord) ¾ Power Swivel Cable (P# EW08432). µ 1 Ferrite Core (P#2169513). REMOTE CONTROL BATTERY INSTALLATION AND REPLACEMENT 1. Open the battery cover of the remote control by BOTTOM VIEW (Remote Control) pushing down and sliding the back cover off. 2. Insert two new "AA" and "AAA" size batteries for the remote control and Simple Remote Control. When replacing old batteries, push them towards the springs and lift them out. Press down and slide back to remove. 3. Match the batteries to the (+) and (-) marks in the battery compartment. 4. Replace the cover. BOTTOM VIEW (Simple Remote Control) Lift up on tab to remove back cover. CAUTION: Do not insert batteries with the '+'and '-' polarities reversed as this may cause the batteries to swell or rupture resulting in leakage. 4
-
 1
1 -
 2
2 -
 3
3 -
 4
4 -
 5
5 -
 6
6 -
 7
7 -
 8
8 -
 9
9 -
 10
10 -
11
-
12
-
13
-
14
-
15
-
16
-
17
-
18
-
19
-
20
-
21
-
22
-
23
-
24
-
25
-
26
-
27
-
28
-
29
-
30
-
31
-
32
-
33
-
34
-
35
-
36
-
37
-
38
-
39
-
40
-
41
-
42
-
43
-
44
-
45
-
46
-
47
-
48
-
49
-
50
-
51
-
52
-
53
-
54
-
55
-
56
-
57
-
58
-
59
-
60
-
61
-
62
-
63
-
64
-
65
-
66
-
67
-
68
-
69
-
70
-
71
-
72
-
73
-
74
-
75
-
76
-
77
-
78
-
79
-
80
-
81
-
82
-
83
-
84
-
85
-
86
-
87
-
88
-
89
-
90
-
91
-
92
-
93
-
94
-
95
-
96
-
97
-
98
-
99
-
100
-
101
-
102
-
103
-
104
 |
 |
