Hitachi B13FI Instruction Manual - Page 14
Danger, Warning - 10 inch drill press
 |
UPC - 717709012035
View all Hitachi B13FI manuals
Add to My Manuals
Save this manual to your list of manuals |
Page 14 highlights
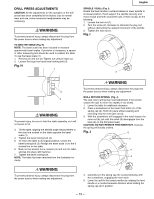
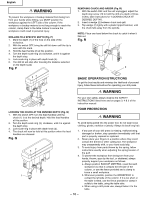
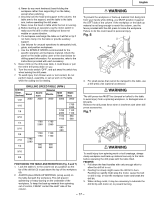
English 6. If the quill moves up and down as easily as you desire, tighten the inner nut (4) with the adjustable wrench. If too loose, repeat steps 2 through 4 to tighten. If too tight, reverse steps 3 and 4. DO NOT OVERTIGHTEN and restrict quill movement. 7. Replace the jam nut (3) and tighten against the inner nut (4) to prevent the inner nut from reversing. WARNING To avoid injury from an accidental start, ALWAYS make sure the switch is in the OFF position, the switch key is removed, and the plug is not connected to the power source outlet before making belt adjustments. BELT TENSION (Fig. K) 1 To release the belt tension, turn the belt tension lock knob (1) on the right side of the drill press head counterclockwise. 2. To tighten the belts, push the motor mounting plate (2) toward the rear (motor) end. 3. To loosen the belts, pull the motor mounting plate (2) toward the front (switch) end. 4. Lock the belt tension lock knob (1) by turning clockwise. NOTE: Belt tension is correct if the belt deflects approximately 1/2 inch when pressed at its center. Fig. K • Any adjustments to increase the laser power is forbidden. • When using the laser pointer, do not point the laser beam towards people and / or reflecting surfaces. Even a laser beam of lower intensity may cause eye damage. Therefore, do not look directly into the laser beam. • If the laser pointer is stored for more than three months without use, please remove the batteries to avoid damage from possibly leaking batteries. • The laser pointer includes no user serviceable components. Never open the housing for repair or adjustments. • On units equipped with the Laser-Guide attachment, repairs shall only be carried out by the laser manufacturer or authorized agent. • Laser Warning label: Max output
-
 1
1 -
2
-
3
-
4
-
5
-
6
-
7
-
8
-
 9
9 -
 10
10 -
 11
11 -
 12
12 -
 13
13 -
 14
14 -
 15
15 -
 16
16 -
 17
17 -
 18
18 -
 19
19 -
20
-
21
-
22
-
23
-
24
-
25
-
26
-
27
-
28
-
29
-
30
-
31
-
32
-
33
-
34
-
35
-
36
-
37
-
38
-
39
-
40
-
41
-
42
-
43
-
44
-
45
-
46
-
47
-
48
-
49
-
50
-
51
-
52
-
53
-
54
-
55
-
56
 |
 |