Hitachi DH30PC2 Instruction Manual - Page 13
Rotation only - sds
 |
UPC - 717709011113
View all Hitachi DH30PC2 manuals
Add to My Manuals
Save this manual to your list of manuals |
Page 13 highlights
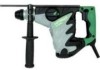
English (1) Mount the drill bit. (2) Pull the trigger switch after applying the drill bit tip to the drilling position (Fig. 5) (3) Pushing the rotary hammer forcibly is not necessary at all. Pushing slightly so that drill dust comes out gradually is just sufficient. CAUTION: Fig. 5 When the drill bit touches an iron reinforcing rod, the bit will stop immediately and the rotary hammer will react to revolve. Therefore please grip the side handle and handle tightly as shown in Fig. 5. Change lever 3. Rotation only This rotary hammer can be set to rotation only mode by pressing the push button and turning the change lever to mark. (Fig. 6) Turn the grip slightly and confirm that the clutch has been engaged with a click. To drill a wood or metal material using the separately sold drill chuck and chuck adaptor, proceed as follows. Installing drill chuck and chuck adaptor (Fig. 7): (1) Attach the drill chuck to the chuck adaptor. (2) The part of the SDS-plus shank is the same as the drill bit. Therefore, refer to the item of "Mounting the drill bit" for attaching it. Push button Fig. 6 Grip Front cap Drill chuck Chuck Part of SDS-plus adaptor shank CAUTION: Fig. 7 Application of force more than necessary will not only reducing drilling efficiency at all, but will deteriorate the tip edge of the drill bit and reduce the service life of the rotary hammer in addition. Drill bit may snap off while withdrawing the rotary hammer from the drilled hole. For withdrawing, it is important to use a pushing motion. Do not attempt to drill anchor holes or holes in concrete with the main unit in the rotation only function. Do not attempt to use the rotary hammer in the rotation and hammering func- tion with the drill chuck and chuck adaptor attached. This would seriously shorten the service life of every components of the machine. 13
-
 1
1 -
2
-
3
-
4
-
5
-
6
-
7
-
 8
8 -
 9
9 -
 10
10 -
 11
11 -
 12
12 -
 13
13 -
 14
14 -
 15
15 -
 16
16 -
 17
17 -
 18
18 -
19
-
20
-
21
-
22
-
23
-
24
-
25
-
26
-
27
-
28
-
29
-
30
-
31
-
32
-
33
-
34
-
35
-
36
-
37
-
38
-
39
-
40
-
41
-
42
-
43
-
44
-
45
-
46
-
47
-
48
-
49
-
50
-
51
-
52
-
53
-
54
-
55
-
56
-
57
-
58
-
59
-
60
-
61
-
62
-
63
-
64
-
65
-
66
-
67
-
68
-
69
-
70
-
71
-
72
-
73
-
74
-
75
-
76
 |
 |
