Hitachi DZ-MV200A Owners Guide - Page 43
Recording Stills
 |
View all Hitachi DZ-MV200A manuals
Add to My Manuals
Save this manual to your list of manuals |
Page 43 highlights
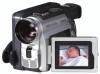
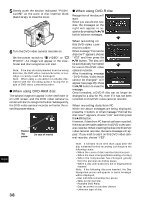
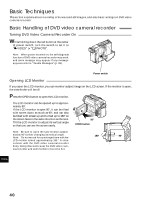
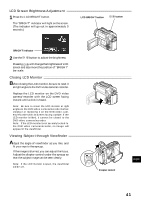
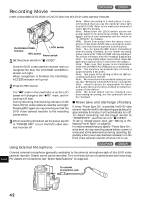
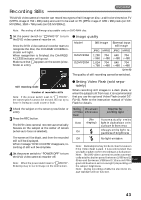
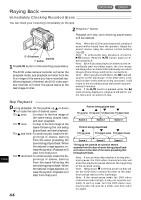
Recording Stills This DVD video camera/recorder can record two types of still image on disc - a still to be viewed on TV (MPEG image of 704 × 480 pixels) and a still to be used on PC [JPEG image of 1280 × 960 pixels (on DZMV230A), 1024 × 768 pixels (on DZ-MV200A)]. Note: Recording of still images is possible only on DVD-RAM disc. 1 Set the power switch to " PHOTO" to turn the DVD video camera/recorder on. Once the DVD video camera/recorder starts to recognize the disc, the CHARGE/ACCESS indicator will light. When recognition is finished, the CHARGE/ ACCESS indicator will go out. Make sure that appears on the screen (viewfinder or LCD). ● Image quality Model Still image External input still image DZ-MV230A DZ-MV200A JPEG MPEG JPEG MPEG 1,280 × 960 1,024 × 768 704 × 480 704 × 480 640 × 480 640 × 480 704 × 480 704 × 480 (pixels) The quality of still recording cannot be switched. Still recording mode Number of recordable stills Note: If the power switch is set to " PHOTO", the LOCK switch cannot be moved. Do not try to force it: Doing so could cause a fault. ● Setting Video Flash (sold separately) When recording still images in a dark place, or when the subject is lit from rear, it is recommended that you use the optional Video Flash (model DZFLH3). Refer to the instruction manual of Video Flash for details. 2 Check the subject on the screen (viewfinder or LCD). 3 Press the REC button. The DVD video camera/recorder automatically focuses on the subject at the center of screen (when auto focus is selected). The screen will be black, and then the recorded still will be displayed. When message "DISC ACCESS" disappears, recording of still will be complete. 4 Set the power switch to "POWER OFF" to turn the DVD video camera/recorder off. Note: When the power switch is set to " PHOTO", flickering may occur in image on the LCD screen. Setting On-screen of Video information Flash (No Auto display) On Manner for emitting light Automatically emits light in dark place or in a place lit from rear. Always emits light regardless of brightness Off No light emission Note: Dark subjects may not be in clear focus even if the Video Flash is used. It is recommended that you light a subject when recording in a dark place. Note: The DVD video camera/recorder automati- cally sets the shutter speed 30 second (between 1/800 between 1/800 and 1/ and 1/10 second if Pro- English gram AE has been set to Low Light) depending on the subject brightness. Note: During recording of stills, the electronic im- age stabilizer will not function. 43
-
 1
1 -
2
-
3
-
4
-
5
-
6
-
7
-
8
-
9
-
10
-
11
-
12
-
13
-
14
-
15
-
16
-
17
-
18
-
19
-
20
-
21
-
22
-
23
-
24
-
25
-
26
-
27
-
28
-
29
-
30
-
31
-
32
-
33
-
34
-
35
-
36
-
37
-
 38
38 -
 39
39 -
 40
40 -
 41
41 -
 42
42 -
 43
43 -
 44
44 -
 45
45 -
 46
46 -
 47
47 -
 48
48 -
49
-
50
-
51
-
52
-
53
-
54
-
55
-
56
-
57
-
58
-
59
-
60
-
61
-
62
-
63
-
64
-
65
-
66
-
67
-
68
-
69
-
70
-
71
-
72
-
73
-
74
-
75
-
76
-
77
-
78
-
79
-
80
-
81
-
82
-
83
-
84
-
85
-
86
-
87
-
88
-
89
-
90
-
91
-
92
-
93
-
94
-
95
-
96
-
97
-
98
-
99
-
100
-
101
-
102
-
103
-
104
-
105
-
106
-
107
-
108
-
109
-
110
-
111
-
112
-
113
-
114
 |
 |