Hitachi L47V651 Owners Guide - Page 11
Side Panel Controls - software
 |
View all Hitachi L47V651 manuals
Add to My Manuals
Save this manual to your list of manuals |
Page 11 highlights
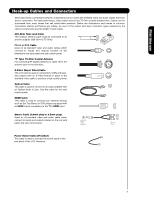
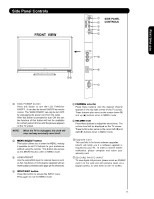
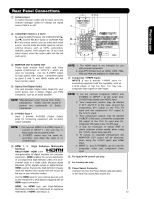
Side Panel Controls FRONT VIEW ቢ SIDE PANEL ቦ CONTROLS ቧ ብ ባ First time use ቪቩ ቫ ቤ PHOTO INPUT ቨ ቢ SIDE POWER button Press this button to turn the LCD Television ON/OFF. It can also be turned ON/OFF by remote control. The "MAIN POWER" can only be turn OFF by unplugging the power cord from the outlet. After this button is pressed to turn ON the set, the function of this button will not be available for a short period of time until the picture appears on the TV screen. NOTE: When the TV is unplugged, the clock will stop and may eventually reset itself. ባ MENU/SELECT button This button allows you to enter the MENU, making it possible to set TV features to your preference without using the remote. This button also serves as the SELECT button when in MENU mode. ቤ HDMI-FRONT Use the side HDMI input for external devices such as Set-Top-Boxes or DVD players equipped with an HDMI output connection (see page 14 for reference). ብ INPUT/EXIT button Press this button to access the INPUT menu. Press again to exit the MENU mode. ቦ CHANNEL selector Press these buttons until the desired channel appears in the top right corner of the TV screen. These buttons also serve as the cursor down (̄) and up (̆) buttons when in MENU mode. ቧ VOLUME level Press these buttons to adjust the sound level. The volume level will be displayed on the TV screen. These buttons also serve as the cursor left (̇) and right (̈) buttons when in MENU mode. ቨ Upgrade Card This card slot is for future software upgrades. Hitachi will notify you if a software upgrade is required for your TV. In order to receive written notification, please complete and return your warranty card. ቨ SD CARD PHOTO INPUT To view digital still pictures, please insert an SD/MMC card in to the card slot with pictures taken on a Digital camera, to view them on the TV screen. 11
-
 1
1 -
2
-
3
-
4
-
5
-
 6
6 -
 7
7 -
 8
8 -
 9
9 -
 10
10 -
 11
11 -
 12
12 -
 13
13 -
 14
14 -
 15
15 -
 16
16 -
17
-
18
-
19
-
20
-
21
-
22
-
23
-
24
-
25
-
26
-
27
-
28
-
29
-
30
-
31
-
32
-
33
-
34
-
35
-
36
-
37
-
38
-
39
-
40
-
41
-
42
-
43
-
44
-
45
-
46
-
47
-
48
-
49
-
50
-
51
-
52
-
53
-
54
-
55
-
56
-
57
-
58
-
59
-
60
-
61
-
62
-
63
-
64
-
65
-
66
-
67
-
68
-
69
-
70
-
71
-
72
-
73
-
74
-
75
-
76
-
77
-
78
-
79
-
80
-
81
-
82
-
83
-
84
-
85
-
86
-
87
-
88
-
89
-
90
-
91
-
92
-
93
-
94
-
95
-
96
-
97
-
98
-
99
-
100
-
101
-
102
-
103
-
104
-
105
-
106
-
107
-
108
-
109
-
110
-
111
-
112
-
113
-
114
-
115
-
116
-
117
-
118
-
119
-
120
-
121
-
122
-
123
-
124
-
125
-
126
-
127
-
128
-
129
-
130
-
131
-
132
-
133
-
134
-
135
-
136
-
137
-
138
-
139
-
140
-
141
-
142
-
143
-
144
-
145
-
146
-
147
-
148
-
149
-
150
 |
 |
