Hitachi L47V651 Owners Guide - Page 58
Cursor Pad, Cursor
 |
View all Hitachi L47V651 manuals
Add to My Manuals
Save this manual to your list of manuals |
Page 58 highlights
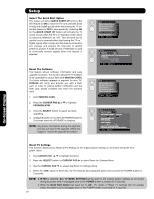
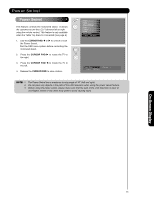
Setup Set The Inputs Use this feature to give a name to any of the video inputs. 1. Press the CURSOR PAD ̆, ̄ to highlight the video inputs. 2. Press the CURSOR PAD ̇, ̈ to select your choices. Setup Setup The Menu Options Set The Power Saving Set The Inputs Set The Closed Captions Select The Quick Start Option Reset The Software Move SEL Select NOTA: The inputs labeled Gray Out(Skip) or Hide(Skip) are disabled in the INPUTS selection. OR INPUT 3 Auto Link Use this function to automatically turn the TV on and tune to INPUT 3 when it detects a video signal to INPUT 3. Setup Set The Inputs Input1 : **** Input2 : **** Input3 : **** Auto Link : Off Input-Front : **** HDMI1 : **** HDMI2 : **** HDMI-Front : **** Move SEL Return 1. Use the CURSOR PAD ̆ or ̄ to highlight the AUTO LINK option and ̇ or ̈ to change between the Off and Auto. Auto When AUTO is selected, the TV will turn on and switch to INPUT 3 automatically, when the INPUT 3 input device is turned on. This is convenient when you want to watch a movie with your VCR, laserdisc player, or DVD player. Off Select OFF to disable this function. 2. Press EXIT to quit menu or select SET THE INPUTS to return to previous menu. NOTE: 1. Once the TV has been turned on using the AUTO LINK feature, it must be reset before AUTO LINK is used again. To do this, turn your VCR, laserdisc, or DVD player OFF. This feature is now reset and will turn on your TV as described above. 2. If no remote control button is pressed after the TV is turned on by AUTO LINK, the TV will automatically turn off after three hours. On-Screen Display 58
-
 1
1 -
2
-
3
-
4
-
5
-
6
-
7
-
8
-
9
-
10
-
11
-
12
-
13
-
14
-
15
-
16
-
17
-
18
-
19
-
20
-
21
-
22
-
23
-
24
-
25
-
26
-
27
-
28
-
29
-
30
-
31
-
32
-
33
-
34
-
35
-
36
-
37
-
38
-
39
-
40
-
41
-
42
-
43
-
44
-
45
-
46
-
47
-
48
-
49
-
50
-
51
-
52
-
 53
53 -
 54
54 -
 55
55 -
 56
56 -
 57
57 -
 58
58 -
 59
59 -
 60
60 -
 61
61 -
 62
62 -
 63
63 -
64
-
65
-
66
-
67
-
68
-
69
-
70
-
71
-
72
-
73
-
74
-
75
-
76
-
77
-
78
-
79
-
80
-
81
-
82
-
83
-
84
-
85
-
86
-
87
-
88
-
89
-
90
-
91
-
92
-
93
-
94
-
95
-
96
-
97
-
98
-
99
-
100
-
101
-
102
-
103
-
104
-
105
-
106
-
107
-
108
-
109
-
110
-
111
-
112
-
113
-
114
-
115
-
116
-
117
-
118
-
119
-
120
-
121
-
122
-
123
-
124
-
125
-
126
-
127
-
128
-
129
-
130
-
131
-
132
-
133
-
134
-
135
-
136
-
137
-
138
-
139
-
140
-
141
-
142
-
143
-
144
-
145
-
146
-
147
-
148
-
149
-
150
 |
 |
