Hitachi L47V651 Owners Guide - Page 40
On-Screen Display
 |
View all Hitachi L47V651 manuals
Add to My Manuals
Save this manual to your list of manuals |
Page 40 highlights
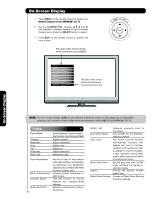
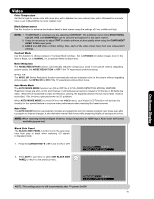
Video On-Screen Display Video Select VIDEO to adjust picture settings and improve picture quality. You can independently customize each of the Video Inputs to your preference to increase viewing performance and pleasure depending upon the video program being viewed. If RESET is selected, only the selected input will reset to initial conditions. Picture Mode Use this function to choose from automatic picture settings to optimize your TV's performance. 1. Use the CURSOR buttons ̇ or ̈ to highlight and select PICTURE MODE settings (Day-Normal, Day-Dynamic or Night). 2. Then press the SELECT button to set the mode and return to the Video menu or press EXIT to quit menu. 3. There are 3 Picture Modes available for the customer Day (Dynamic) , Day (Normal) and Night mode. Day (Dynamic) is the original factory preset mode , this can be changed by adjusting any video setting to your desire conditions. Day ( Normal ) can be used as a second video setting for daytime viewing. Night is set to watch programing during nigthtime. Video Audio Channel Manager Locks Timers Setup Power Swivel Move SEL Select Video CCaabbllee PPiiccttuurree MMooddee DDaayy ((DDyynnaammiicc)) OR CCoonnttrraasstt BBrriigghhttnneessss 110000%% 5500%% CCoolloorr 6622%% TTiinntt SShhaarrppnneessss 5500%% BBaacckk LLiigghhtt 1ig0h0% CCoolloorr TTeemmppeerraattuurree HHiigghh BBllaacckk EEnnhhaanncceemmeenntt High MMoovvee SSEELL SSeelleecctt OR Picture Mode Day (Dynamic) Next/Prev Select SEL Return 1. Use the CURSOR PAD ̆ or ̄ to highlight the function to be adjusted. 2. Press the SELECT button or the CURSOR PAD ̈ to select the function settings. 3. Press the CURSOR PAD ̇ or ̈ to adjust the function. 4. Press MENU to return to main menu. 5. Press EXIT to quit menu. Contrast Use this function to change the contrast between black and white levels in the picture. Brightness Use this function to adjust overall picture brightness. Color Use this function to adjust the level of color in the picture. Contrast Next/Prev 100% Change SEL Return Tint Use this function to adjust flesh tones so they appear natural. Sharpness Use this function to adjust the amount of fine detail in the picture. Back Light Use this function to change the back light of the LCD panel, this will increase or decrease the brightness of the LCD panel but not the brightness of the video signal. 40
-
 1
1 -
2
-
3
-
4
-
5
-
6
-
7
-
8
-
9
-
10
-
11
-
12
-
13
-
14
-
15
-
16
-
17
-
18
-
19
-
20
-
21
-
22
-
23
-
24
-
25
-
26
-
27
-
28
-
29
-
30
-
31
-
32
-
33
-
34
-
 35
35 -
 36
36 -
 37
37 -
 38
38 -
 39
39 -
 40
40 -
 41
41 -
 42
42 -
 43
43 -
 44
44 -
 45
45 -
46
-
47
-
48
-
49
-
50
-
51
-
52
-
53
-
54
-
55
-
56
-
57
-
58
-
59
-
60
-
61
-
62
-
63
-
64
-
65
-
66
-
67
-
68
-
69
-
70
-
71
-
72
-
73
-
74
-
75
-
76
-
77
-
78
-
79
-
80
-
81
-
82
-
83
-
84
-
85
-
86
-
87
-
88
-
89
-
90
-
91
-
92
-
93
-
94
-
95
-
96
-
97
-
98
-
99
-
100
-
101
-
102
-
103
-
104
-
105
-
106
-
107
-
108
-
109
-
110
-
111
-
112
-
113
-
114
-
115
-
116
-
117
-
118
-
119
-
120
-
121
-
122
-
123
-
124
-
125
-
126
-
127
-
128
-
129
-
130
-
131
-
132
-
133
-
134
-
135
-
136
-
137
-
138
-
139
-
140
-
141
-
142
-
143
-
144
-
145
-
146
-
147
-
148
-
149
-
150
 |
 |
