Hitachi c10fs Instruction Manual - Page 26
Saw Blade Mounting And Dismounting
 |
View all Hitachi c10fs manuals
Add to My Manuals
Save this manual to your list of manuals |
Page 26 highlights
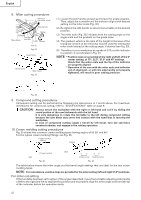
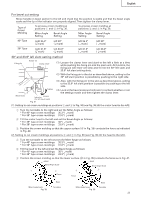
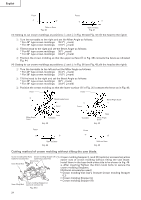
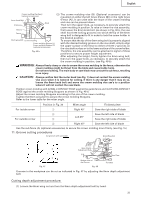
English (2) Adjust to the desired cutting depth by setting the distance between the saw blade and the surface of the base (see b in Fig. 47). (3) The 8mm wing nut must be properly tightened after the adjustment has been completed. NOTE: When cutting a single groove at either end of the workpiece, remove the unneeded portion with a chisel. 12. Cutting easily-deformed materials, such as aluminum sash Materials such as aluminum sash can easily deform when tightened too much in a vise assembly. This will cause inefficient cutting and possible overload of the motor. When cutting such materials, use a wood plate to protect the workpiece as shown in Fig. 49-a. Set the wood plate near the cutting section. When cutting aluminum materials, coat the saw blade with cutting oil (non-combustible) to achieve smooth cutting and a fine finish. In addition, in case of a U-shaped workpiece, use the wood plate as shown in Fig. 49-b to ensure stability in the lateral direction, and clamp it near the cutting section of the workpiece and tighten it using both the vise assembly and the clamp available in the market. Fence Vise Assembly Wood Plate Aluminum Sash 6mm Knob Bolt Wood Plate Fig. 49-a Fence Vise Assembly Clamp Wood Plate Wood Plate Aluminum Sash Fig. 49-b 13. How to use the dust bag (Standard accessory) Dust Bag (1) When the dust bag has become full of sawdust, dust will be blown out of the dust bag when the saw blade rotates. Check the dust bag periodically and empty it before it becomes full. Duct (2) During bevel and compound cutting, attach the dust bag at a right angle to the base surface as shown in Fig. 50. Right Angle Base Fig. 50 CAUTION: Empty the dust bag frequently to prevent the duct and the safety cover from becoming clogged. Sawdust will accumulate more quickly than normal during bevel cutting. SAW BLADE MOUNTING AND DISMOUNTING WARNING: * To prevent an accident or personal injury, always turn off the trigger switch and disconnect the power plug from the receptacle before removing or installing a saw blade. If cutting work is done in a state where the bolt is not sufficiently tightened, the bolt can get loose, the blade can come off, and the safety cover can get damaged, resulting in injuries. Also, check that the bolts are properly tightened before plugging the power plug into the receptacle. * If the bolts are attached or detached using tools other than the 10mm box wrench (standard accessory), excessive or improperly tightening occurs, resulting in injury. 1. Mounting the saw blade (Fig. 51-a, Fig. 51-b and Fig. 51-c) (1) Use the accessory 10mm box wrench to loosen the 6mm bolt fastening the spindle cover and then remove the spindle cover. (2) Press in spindle lock and loosen bolt with 10mm box wrench (standard accessory). Since the bolt is left-hand threaded, loosen by turning it to the right as shown in Fig. 51-c. 26
-
 1
1 -
2
-
3
-
4
-
5
-
6
-
7
-
8
-
9
-
10
-
11
-
12
-
13
-
14
-
15
-
16
-
17
-
18
-
19
-
20
-
 21
21 -
 22
22 -
 23
23 -
 24
24 -
 25
25 -
 26
26 -
 27
27 -
 28
28 -
 29
29 -
 30
30 -
 31
31 -
32
-
33
-
34
-
35
-
36
-
37
-
38
-
39
-
40
-
41
-
42
-
43
-
44
-
45
-
46
-
47
-
48
-
49
-
50
-
51
-
52
-
53
-
54
-
55
-
56
-
57
-
58
-
59
-
60
-
61
-
62
-
63
-
64
-
65
-
66
-
67
-
68
-
69
-
70
-
71
-
72
-
73
-
74
-
75
-
76
-
77
-
78
-
79
-
80
-
81
-
82
-
83
-
84
-
85
-
86
-
87
-
88
-
89
-
90
-
91
-
92
-
93
-
94
-
95
-
96
 |
 |
