HoMedics DWS-100 User Manual - Page 2
Setting Time
 |
View all HoMedics DWS-100 manuals
Add to My Manuals
Save this manual to your list of manuals |
Page 2 highlights
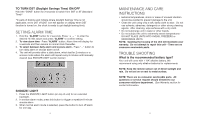
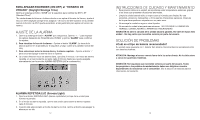
BATTERY INSTALLATION Lift off the battery cover on the back of the unit. Install 1 AA alkaline battery according to the polarity indicated. Close the battery cover. After battery installation, the unit will beep then display 12:00 p.m. 1/1/2000 and the room temperature. The time zone will default to PST - Pacific Standard Time. SETTING TIME About the Atomic Clock The National Institute of Standard and Technology (NIST) in Fort Collins, Colorado broadcasts the time signal (WWVB at 60kHz AM radio signal) with an accuracy of 1 second per every 3,000 years. The signal will able to cover over a distance up to 2,000 miles from the source. Like a typical AM radio, your Atomic Clock will not able to receive the WWVB signal in places surrounded by heavy concrete or metal panels. The reception of the time signal can be affected by mobile phones, tv, electrical appliances or other electronic interference. To get the best performance of the Atomic clock, please install the home receiver near a window and away from large metallic objects. If the unit is not working properly, change the unit position. There may be some interference at this location. TIME ZONE Press " ZONE" button to select from the following time zones in the U.S.PST - Pacific Standard Time MST - Mountain Standard Time CST - Central Standard Time EST - Eastern Standard Time 1. Once a Time Zone is selected, your atomic clock will start to receive the signal. 2. While the atomic clock is searching, the icon will change gradually indicating the seek condition. 3. If a valid signal is available, the atomic clock will display the correct local time in about 3 - 5 minutes. The tower icon and "OK" will appear on the display. 2 4. If the first reception is not successful, the clock will attempt every hour until successful. 5. Try setting the unit in multiple locations for best reception. Remember to place the unit away from sources of interference such as mobile phones, appliances, TV etc. 6. If signal is not available when setting up, you may need to enter the time manually. MANUAL SETTING FOR CLOCK & CALENDAR 1. Hold "SET " button for 3 seconds to enter clock set. 2. Select Year - Use the " + , - " buttons located on the back of the home receiver to adjust year setting. Press " SET " button to confirm your selection. 3. Select Month - Use the " + , - " buttons located on the back of the home receiver to adjust month setting. Press " SET " button to confirm your selection. 4. Select Day - Use the " + , - " buttons located on the back of the home receiver to adjust day setting. Press " SET " button to confirm your selection. 5. Select 12 hour or 24 hour setting - Use the " + , - " buttons located on the back of the home receiver. Press " SET " button to confirm your selection. 6. Select Hour - Use the " + , - " buttons located on the back of the home receiver to adjust hour setting. Press " SET " button to confirm your selection. 7. Select Minute - Use the " + , - " buttons located on the back of the home receiver to adjust minute setting. Press " SET " button to confirm your selection. Fahrenheit/Centigrade Selection - You can now select either Centigrade or Fahrenheit temperature readings. Press " SET " button to select between centigrade or fahrenheit readings. 3
-
 1
1 -
 2
2 -
 3
3 -
 4
4 -
 5
5 -
 6
6 -
 7
7 -
 8
8
 |
 |
