HoMedics DWS-320 User Manual - Page 4
Trouble Shooting
 |
View all HoMedics DWS-320 manuals
Add to My Manuals
Save this manual to your list of manuals |
Page 4 highlights
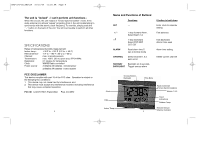
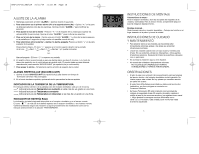
DWS-320-IB_ENG\SP 10/12/04 11:38 AM Page 7 • Once a channel is registered, it will not accept any new sensors. However, registered channels can be erased by removing the batteries in the remote sensor or the home unit. • When replacing batteries for the remote sensor - Remember to clear the corresponding channel of the home receiver by removing the batteries or selecting the respective channel of the sensor by pressing the CHANNEL button on the home receiver. Hold the CHANNEL button for 3 seconds to clear the registration. • When replacing batteries for the home receiver - Please remove the batteries of all remote sensors. Once you have replaced the home receiver batteries, re-install the batteries to the sensors and re-log them in again. This will ensure that the home receiver and the remote sensors are properly synchronized. • Press the TX button on the back of remote sensor to verify the RF reception. • It is recommended to test the home receiver and the remote sensor next to each other to ensure that both are properly synchronized. • Keep the remote sensor out of direct sunlight and rain. Do not mount on a metal surface. About the Atomic Clock The National Institute of Standard and Technology (NIST) in Fort Collins, Colorado broadcasts the time signal (WWVB at 60kHz AM radio signal) with an accuracy of 1 second per every 3,000 years. The signal will cover a distance up to 2,000 miles from the source. Like a typical AM radio, your Atomic Clock will not able to receive the WWVB signal in places surrounded by heavy concrete or metal panels. The reception of the time signal can be affected by mobile phones, TV, electrical appliances or other electronic interference. To get the best performance of the Atomic clock, please install the home receiver near a window and away from large metallic objects. If the unit is not working properly, change the unit position. There may be some interference at this location. TROUBLE SHOOTING Indoor and Outdoor temperatures do not match when placed next to each other - Each sensor is manufactured to be +/- 2 degrees in accuracy under normal conditions. So it is possible to have up to four degrees difference shown on the separate temperature sensors (one could be "+2 degrees" and the other "-2 degrees". Additionally, the calibration curve is different between the two units because of the greater temperature range of the outdoor sensor. Errors are usually noted on the extreme ends of the temperature ranges. 6 Base unit is not accepting remote transmissions - The units may not be properly synchronized or the batteries may need to be replaced. See "GETTING STARTED" section beginning on page 2 of the instructions for detailed instructions. With the two units next to each other, attempt synchronization. Remember to always place the remote sensor within the effective transmission range and away from large metal surfaces. What is the recommended battery type? We recommend using only alkaline batteries for replacements. Where can I mount the remote sensor? To get accurate readings and to prolong the life of your sensor, we recommend that you mount it out of direct sunlight and rain. Fog and mist will not affect the sensor, but large volumes of soaking rain may. To guard against this, we recommend that you mount it under the eve of your house, your garage or any other suitable place that will keep it out of direct sun and rain. Outdoor Temperature Reading shows "- -" This is usually an indication that the channel selector (located in the top left corner of the home receiver) is set incorrectly to receive the signal from the remote sensor. If you have only one remote sensor, ensure that the channel selector is set to "1". To change the channel, press the "channel" button located on the back of the home receiver. The home receiver may also be "scrolling" - looking for sensor readings from more than one remote sensor. This home receiver can support up to three remote sensors (only one is included). If it is looking for more than one remote sensor, a " " icon will appear below the channel designator. Again, to select a reading from just one remote sensor, press the "channel" button to remove the scroll icon and ensure that the channel selected now reads "1". 7
-
 1
1 -
 2
2 -
 3
3 -
 4
4 -
 5
5 -
 6
6 -
 7
7 -
 8
8 -
 9
9 -
 10
10
 |
 |