Honeywell CT1500 Owner's Manual - Page 5
Remove, Thermostat
 |
View all Honeywell CT1500 manuals
Add to My Manuals
Save this manual to your list of manuals |
Page 5 highlights
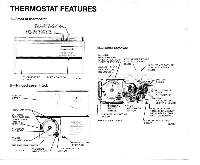
"3 F REMOVE OLD THERMOSTAT 0 0Remove cover of old thermostat. If the cover doesn't snap off when pulled firmly from the bottom, check for a screw that locks the cover on. 0Before removing the old thermostat from the wall, look at it carefully to locate the heat anticipator adjustment mechanism. (See illustration to help you recognize the heat anticipator.) Make a note h e r e l l o f that anticipator setting for future reference. If your thermostat does not have a heat anticipator, do not be concerned. Move on to next paragraph. Loosen screws holding thermostat to wallplate, subbase or wall and lift away. Disconnect wires from old thermostat wallplate or subbase. Tape each wire and label with the letter of the terminal designation to make reconnection easier. If there are only two wires, labeling is not necessary. IMPORTANT thermostat cannot be used on your system. EXCEPTION: The CT1502 thermostat can be used on a system with B or 0 terminals. One or two extra wires? If you are replacing a Honeywell Chronotherm thermostat,you may find one or two wires that go to the clock terminals on the Chronotherm thermostat wiring wallplate. Do not allow them to touch, or you may damage your transformer. Disconnect the wires, and wrap them separately, using electrical tape. Do not wrap them together. Place the wires where they will not interfere with the operation of the new thermostat. Record the colors and terminal designation labels of the rest of the wires. 3 69-0273-9 ~
-
 1
1 -
 2
2 -
 3
3 -
 4
4 -
 5
5 -
 6
6 -
 7
7 -
 8
8 -
 9
9 -
 10
10 -
 11
11 -
12
-
13
-
14
-
15
-
16
-
17
-
18
-
19
-
20
 |
 |
