Honeywell CT87B Owner's Manual
Honeywell CT87B Manual
 |
UPC - 085267870245
View all Honeywell CT87B manuals
Add to My Manuals
Save this manual to your list of manuals |
Honeywell CT87B manual content summary:
- Honeywell CT87B | Owner's Manual - Page 1
. If you are unsure which model is right for your system, visit www.honeywell.com/ yourhome or call Honeywell Customer Care at 1-800-468-1502. Installation Instructions Compatible with: Heating/Cooling system CT87A CT87B CT87J Heating only: Gas or oil fueled warm air, steam, or hot Yes water - Honeywell CT87B | Owner's Manual - Page 2
below, record the number that the adjustment lever points to. This is the current (amp) MERCURY SWITCH rating of your heating system. OLD THERMOSTAT ANTICIPATOR SCALE Current setting: If you cannot find the heat LEVER anticipator setting on the old thermostat, you can use a TYPICAL LOCATION - Honeywell CT87B | Owner's Manual - Page 3
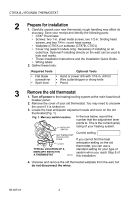
CT87A,B,J ROUND® THERMOSTAT 5. Label the wires using the wiring labels that came with the CT87. Fig. 2. Labeling wires. Identify each wire using the letter of the terminal on the old thermo- stat (Fig. 2). Do not label the wires by color. 6. Disconnect the wires from the old thermostat and - Honeywell CT87B | Owner's Manual - Page 4
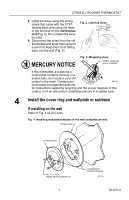
CT87A,B,J ROUND® THERMOSTAT : Position so that the fan and heating/cooling switches are on the top. 3. Use work. Fig. 5. Installing wallplate/subbase on an outlet box (subbase shown). 1/2 IN. BINDING HEAD SCREW (2) OUTLET BOX 1 2 COVER RING SUBBASE 1/4 IN. ROUND HEAD SCREW (2) A THERMOSTAT WIRING - Honeywell CT87B | Owner's Manual - Page 5
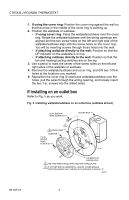
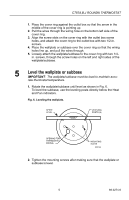
accu- rate thermostat temperature. 1. Rotate the wallplate/subbase until level as shown in Fig. 6. To level the subbase, use the leveling posts directly below the Heat and Fan indicators. Fig. 6. Leveling the wallplate. SPIRIT LEVEL LEVELING POSTS (2) OPENING FOR THERMOSTAT WIRING MOUNTING - Honeywell CT87B | Owner's Manual - Page 6
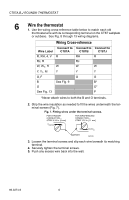
CT87A,B,J ROUND® THERMOSTAT 6 Wire the thermostat 1. Use the wiring cross-reference table below to match each old thermostat wire with its corresponding terminal on the CT87 wallplate or subbase. See Fig. 8 through 13 wiring diagrams. Wiring Cross-reference Wire Label R, RH, 4, V Rc, R W, W1, - Honeywell CT87B | Owner's Manual - Page 7
system. R Y W CT87A WALLPLATE WIRE LABELS (LETTERS ON ORIGINAL THERMOSTAT TERMINALS) R 3-WIRE W HOT WATER ZONE VALVE B M20184 Fig. 10. CT87B for a 4-wire heating/cooling system. COOL • OFF • HEAT FAN ON RH G RC Y W AUTO • CT87B SUBBASE POWER FAN COOL TO SYSTEM HEAT JUMPER RH TO RC - Honeywell CT87B | Owner's Manual - Page 8
CT87A,B,J ROUND® THERMOSTAT Fig. 11. CT87B for a 5-wire heating/cooling system. COOL • OFF • HEAT FAN ON RH G RC Y W AUTO • CT87B SUBBASE HEATING POWER FAN TO SYSTEM COOLING POWER TO SYSTEM COOL HEAT Fig. 12. CT87J for a 4-wire single stage heat pump. M20225 COOL • OFF • HEAT FAN - Honeywell CT87B | Owner's Manual - Page 9
CT87A,B,J ROUND® THERMOSTAT 7 Mount the thermostat 1. Pull off the thermostat cover and discard the red plastic insert that holds the mercury switch in place during shipping. 2. Using a pencil point, slide the heat anticipator indicator to 1.2 on the scale as shown in Fig. 14. IMPORTANT: This - Honeywell CT87B | Owner's Manual - Page 10
shuts off before the set temperature is reached, move the anticipator pointer up by .1 ampere. Never adjust the anticipator below .3 ampere. 9 Check heating/cooling operation Check heating 1. Turn the transparent dial to the farthest point left. 2. If your CT87 has a subbase, set the system switch - Honeywell CT87B | Owner's Manual - Page 11
CT87A,B,J ROUND® THERMOSTAT Check cooling IMPORTANT: To avoid damaging the compressor in the air conditioner, do not operate the cooling system when the outdoor temperature is below 50°F (10°C). 1. If your CT87 has a subbase, set the System switch on the left to Cool. IMPORTANT: After heating is - Honeywell CT87B | Owner's Manual - Page 12
CT87A,B,J ROUND® THERMOSTAT Limited One-Year Warranty Honeywell warrants this product, excluding battery, to be free from defects in the workmanship or materials, under normal use and service, for a period of one (1) year from the date of purchase by the consumer. If, at any time during the
-
 1
1 -
 2
2 -
 3
3 -
 4
4 -
 5
5 -
 6
6 -
 7
7 -
8
-
9
-
10
-
11
-
12
 |
 |
fi U.S. Registered Trademark
Copyright ' 2002 Honeywell
All Rights Reserved
69-0274-6
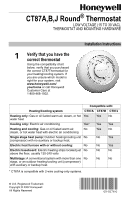
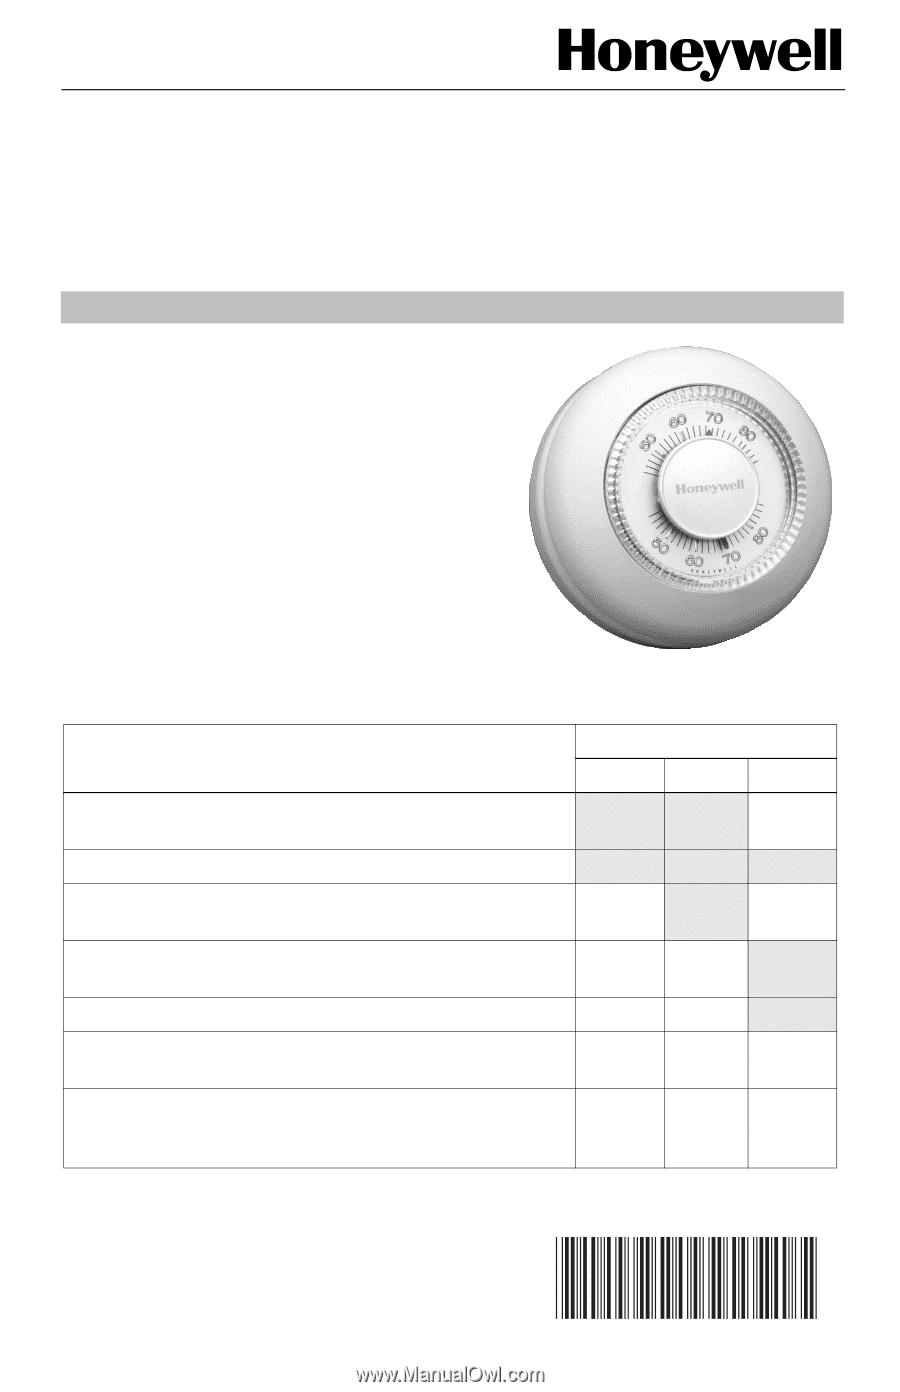
Verify that you have the
correct thermostat
Using the compatibility chart
below, verify that you purchased
the correct CT87Thermostat for
your heating/cooling system. If
you are unsure which model is
right for your system, visit
www.honeywell.com/
yourhome
or call Honeywell
Customer Care at
1-800-468-1502.
* CT87A is compatible with 2-wire cooling-only systems.
Heating/Cooling system
Compatible with:
CT87A
CT87B
CT87J
Heating only:
Gas or oil fueled warm air, steam, or hot
water heat
Yes
Yes
No
Cooling only:
Electric air conditioning
Yes*
Yes
Yes
Heating and cooling:
Gas or oil fueled warm air,
steam, or hot water heat with electric air conditioning
No
Yes
No
Single stage heat pump:
Outdoor heating/cooling unit
(compressor) with no auxiliary or backup heat.
No
No
Yes
Electric heat furnace with or without cooling:
No
No
Yes
Electric baseboard:
Electric heating strips located just
above the floor, usually 120-240 volts
No
No
No
Multistage:
A conventional system with more than one
stage, or an outdoor heating/cooling unit (compressor)
with auxiliary or backup heat.
No
No
No
1
CT87A,B,J Round
fi
Thermostat
LOW VOLTAGE (15 TO 30 VAC),
THERMOSTAT AND MOUNTING HARDWARE
Installation Instructions