Honeywell CT87B Owner's Manual - Page 2
Prepare for installation, Remove the old thermostat, Turn off power, do not disconnect the wires
 |
UPC - 085267870245
View all Honeywell CT87B manuals
Add to My Manuals
Save this manual to your list of manuals |
Page 2 highlights
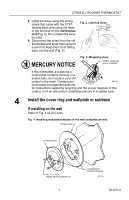
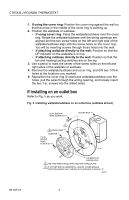
CT87A,B,J ROUND® THERMOSTAT 2 Prepare for installation 1. Carefully unpack your new thermostat; rough handling may affect its accuracy. Save your receipt and identify the following parts: • CT87 Thermostat • Screws: two 1-in. sheet metal screws, two 1/2-in. binding head screws, and two 1/4-in. round head screws • Wallplate (CT87A) or subbase (CT87B, CT87J) • Cover ring (select models only). Necessary if installing on an outlet box. Optional if installing directly on the wall; can be used to hide wall marks. • These Installation Instructions and the Installation Quick Guide. • Wiring labels 2. Gather these tools: Required Tools • Flat blade screwdriver • Spirit level Optional Tools • Hand or power drill with 1/16-in. drill bit • Wire cutter/stripper or sharp knife • Pencil 3 Remove the old thermostat 1. Turn off power to the heating/cooling system at the main fuse/circuit breaker panel. 2. Remove the cover of your old thermostat. You may need to unscrew the cover if it is locked on. 3. Locate the heat anticipator adjustment scale and lever on the old thermostat (Fig. 1). Fig. 1. Mercury switch location. In the box below, record the number that the adjustment lever points to. This is the current (amp) MERCURY SWITCH rating of your heating system. OLD THERMOSTAT ANTICIPATOR SCALE Current setting: If you cannot find the heat LEVER anticipator setting on the old thermostat, you can use a TYPICAL LOCATION OF A standard setting for your type of MERCURY SWITCH IN A THERMOSTAT system when you reach Step 8 of M20206 this installation. 4. Unscrew and remove the old thermostat wallplate from the wall, but do not disconnect the wires. 69-0274-6 2
-
 1
1 -
 2
2 -
 3
3 -
 4
4 -
 5
5 -
 6
6 -
 7
7 -
 8
8 -
9
-
10
-
11
-
12
 |
 |