Honeywell HE220 Owner's Manual - Page 7
TESTING HUMIDIFIER OPERATION, operation, Checklist, How Your Humidifier Works - wiring diagram
 |
View all Honeywell HE220 manuals
Add to My Manuals
Save this manual to your list of manuals |
Page 7 highlights
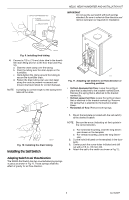
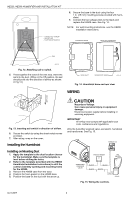
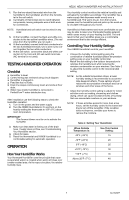
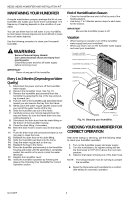
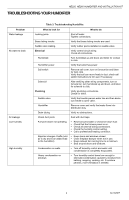
HE220, HE260 HUMIDIFIER AND INSTALLATION KIT 1. Run the two-strand thermostat wire from the humidifier to the humidistat, and from the humidistat to the sail switch. 2. Cut lengths of thermostat wire to reach between components, leaving adequate wire at both ends for connections. NOTE: Humidistat and sail switch can be wired in any order. 3. At the humidifier, connect the black and white conductors to the two yellow humidifier wires. (The red wires from the humidifier are not used.) 4. At the humidistat, connect both black conductors to the two humidistat terminals. Use a wire nut to connect together the two white conductors. 5. At the sail switch, connect the black and white conductors to the Com and NO sail switch terminals (NC terminal is not used). TESTING HUMIDIFIER OPERATION Checklist ❑ Humidifier is level. ❑ Control wiring was reviewed using circuit diagram. ❑ Humidifier is plugged in. ❑ Feed line has no kinks. ❑ Drain line slopes continuously down and ends at floor drain. ❑ Water hose inside humidifier is connected to PerfectFlow™ water distribution tray. After installation use the following steps to check the humidifier operation: 1. Turn on the power and the water supply 2. Turn the H8908 Humidistat to On and turn on the heat by setting the thermostat to 10ºF (6ºC) above room temperature. IMPORTANT The furnace blower must be on to activate the humidifier. 3. Make sure that water is flowing out of the drain hose. If water does not flow, see Troubleshooting Your Humidifier section. 4. Check for leaks. 5. Reset the thermostat and H8908 Humidistat to a comfortable setting for automatic operation. OPERATION How Your Humidifier Works Your Honeywell humidifier uses the principle that vapor (evaporated water) is created when warm air blows over a water-soaked area. As the vapor circulates, the relative humidity rises. Your humidity control monitors the relative humidity and activates the humidifier accordingly. The humidifier has a water supply that dispenses water evenly over a humidifier pad. The warm dry air, from the furnace, passes over the humidifier pad and picks up the moist air to circulate it throughout your home. Humidified air feels warmer and more comfortable so you may be able to lower your thermostat heating setpoint, which saves money on your heating fuel bills. The end result is that your humidifier gives you a comfortable environment that is also energy efficient. Controlling Your Humidity Settings Your H8908 Humidistat controls your humidifier. • Choose the humidity control setting using the combination of relative humidity/outdoor temperature setting scale on your humidity control dial. • Match the dial setting to the outdoor temperature to optimize the humidity level while reducing the moisture condensation on your windows. See Table 2 to adjust the humidity control to the recommended setting. NOTE: As the outside temperature drops, a lower humidity setting is recommended to accommodate dewpoint effects. These settings should reduce the accumulation of moisture and ice on windows and other areas of the home. • Adjust the humidity control setting to adjust for indoor activities such as cooking, showering and clothes drying, which can cause excessive levels of humidity that can accumulate moisture on your windows. NOTE: If these activities persist for more than a few hours, set the humidity control to the lowest setting to turn off the humidifier. If the condition does not improve, ventilate your home to remove the moisture. Table 2. Setting Your Humidistat. When Outside Temperature is: -20°F (-29°C) Use This Control Setting: 15 -10°F (-23°C) 20 0°F (-18°C) 25 +10°F (-12°C) 30 +20°F (-7°C) 35 Above 20°F (-7°C) 40 7 69-1645EF
-
 1
1 -
 2
2 -
 3
3 -
 4
4 -
 5
5 -
 6
6 -
 7
7 -
 8
8 -
 9
9 -
 10
10 -
 11
11 -
 12
12 -
13
-
14
-
15
-
16
-
17
-
18
-
19
-
20
-
21
-
22
-
23
-
24
 |
 |