Honeywell HE360A1043 Owner's Manual - Page 1
Honeywell HE360A1043 Manual
 |
View all Honeywell HE360A1043 manuals
Add to My Manuals
Save this manual to your list of manuals |
Page 1 highlights
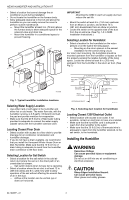
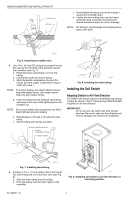
HE360 Humidifier and Installation Kit INSTALLATION INSTRUCTIONS/OWNER'S GUIDE WELCOME To the comfortable world of humidified air. When you use your Honeywell humidifier, notice that your skin is not as dry, and that your scratchy throat and irritated nasal passages that aggravate allergies and asthma are steadily improving. You have also taken the first step in reducing the zapping you create when you walk on your carpet and then touch your TV, computer, metal door knob or your pet. Your furniture and woodwork are also benefitting from the difference that humidified air makes. Congratulations! You have just made a great investment in improving the comfort of your home. APPLICATION This kit contains your new Honeywell HE360 Humidifier, H8908 Humidistat and all the accessories required for installation. INSTALLATION Preparing for the Installation Be sure to identify all the required (Table 1) accessories (included) and make sure the appropriate tools are available before beginning the installation. Required Accessories (Included) Table 1. Required Accessories. Quantity 20 ft (6.2m) Accessory 18 gauge, two-strand thermostat wire 20 ft (6.2m) 10 ft (3.1m) 1/4 in. (6.35 mm) OD feed water tubing 1/2 in (12.7 mm) ID drain tubing Table 1. Required Accessories. Quantity 1 bag 1 1 1 bag Accessory Connecting and mounting hardware: Wire nuts (4) No. 8 sheet metal screws (18) Drain tube clamp Feed tube mounting clamps (6) Brass inserts (2) Plastic compression rings (2) Sail switch H8908 Humidistat Saddle Valve Assembly: Saddle valve and top clamp (1) Threaded bottom clamp (1) Bolts (2) Rubber gasket (1) Eyelet (1) Plastic bushing (1) Required Tools Tools required for installation include: • Tin snip. • Screwdriver. • Adjustable or open-end wrench. • Drill, punch or awl. • Level. Determining Best Location for Humidifier CAUTION Temperature and Static Pressure Hazard. Can cause property or equipment damage. Locate humidifier where ambient temperature is between 32°F (0°C) and 160°F (71°C). Do not install humidifier where freezing temperatures could occur. Be sure supply plenum static pressure is no greater than 0.4 in. wc and water pressure is no greater than 124 psi. • Select a location for the humidifier on the supply (warm air stream) plenum. See Fig. 1. ® U.S. Registered Trademark Copyright © 2002 Honeywell • •All Rights Reserved 69-1646EF- 01
-
 1
1 -
 2
2 -
 3
3 -
 4
4 -
 5
5 -
 6
6 -
 7
7 -
8
-
9
-
10
-
11
-
12
-
13
-
14
-
15
-
16
-
17
-
18
-
19
-
20
-
21
-
22
-
23
-
24
 |
 |