Honeywell HFD-010 User Guide - Page 5
Cleaning The Pre-filter, Removing / Cleaning The Ifd, Filter, Replacing The Ultraviolet Uv Lamps - replacement filter
 |
UPC - 090271000106
View all Honeywell HFD-010 manuals
Add to My Manuals
Save this manual to your list of manuals |
Page 5 highlights
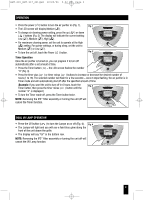
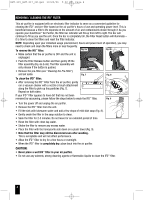
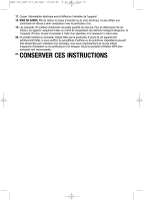
HHT-215_HHT-217_OM.qxd 10/20/06 5:02 PM Page 5 REMOVING / CLEANING THE IFD™ FILTER (CONTINUED) Resetting the Filter Clean Indicator Fig. 5 After cleaning the IFD™ filter, you need to reset the filter monitor. • Once the IFD™ filter has been checked and cleaned, the filter monitor will need to be reset. • With the air purifier unit powered on, press and hold the Filter Reset button for approximately 10 seconds or until the filter bar is clear (Fig. 5). CLEANING THE PRE-FILTER To remove the pre-filter: Press the top tab to release the pre-filter from the filter assembly (Fig. 10). Fig. 10 To clean the pre-filter: The particle pre-filter helps pick-up large airborne particles that enter the filter. The pre-filter can be removed and rinsed by hand under warm water (Fig. 11). Let the pre-filter dry completely before inserting it back into the unit. Fig. 11 REPLACING THE ULTRAVIOLET (UV) LAMPS The UV Reset LED light will illuminate when it is time to replace the dual UV bulbs. Fig. 12 Fig. 13 • Be sure to turn off and unplug your air purifier. • Press the Filter Release button and remove the filter assembly. • The UV bulb housing is on the left and has a finger grip for ease of removal (Fig. 12). Gently remove the UV bulb housing. • Turn the tab towards the unlock symbol ( ) (Fig 13). • Gently grasp the top of the tab and pull the bulb cartridge straight out of the UV socket. Do not touch the bulb directly with your hands. Fig. 14 • Do the same for the bottom tab and pull the bulb cartridge out of the UV socket. • Replace the top and lower UV bulb sockets. • The bulb cartridge will only fit one way; if it does not fit, turn the bulb cartridge the other way (with the arrow pointing to the center of the unit) and insert. • Push down gently so that the bulb cartridge engages with the unit. Turn arrow to the lock position ( ). • Discard old UV bulb cartridge(s) only at household hazardous waste collection sites. • Place UV bulb housing back in air purifier housing and then insert IFD™ filter assembly. • With the air purifier powered on, press and hold the UV reset button . (Fig. 14). NOTE: Bulb and bulb housing are not intended for use with any other product or purpose. 5
-
 1
1 -
 2
2 -
 3
3 -
 4
4 -
 5
5 -
 6
6 -
 7
7 -
 8
8 -
 9
9 -
 10
10 -
 11
11 -
12
-
13
-
14
-
15
-
16
-
17
-
18
-
19
-
20
-
21
-
22
-
23
-
24
-
25
-
26
 |
 |