Honeywell RTH7500 Owners Guide - Page 13
fuse/circuit
 |
View all Honeywell RTH7500 manuals
Add to My Manuals
Save this manual to your list of manuals |
Page 13 highlights
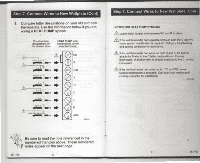
Step 9. Attach New Thermostat to Wallplate 1. Align the screw blocks with the pins on the back of the thermostat WALLPLATE TERMINAL SCREW BLOCK •• s • • • • ( PINS ON BACK OF THERMOSTAT 9 6/72299 2. Push the thermostat straight onto the wallplate until it snaps into place 3. Turn on the power at the heating and/or cooling system or fuse/circuit breaker panel. If the wires interfere with mounting the thermostat to the wallplate, push the excess if wire back into the wall opening 80-1730 zi Step 10. Set the Calendar This thermostat is designed to automatically keep current time and day in memory for up to ten years. under normal use. once the calendar is set. When the thermostat is first powered, the display is ready to set the calendar. 1. Use Up or Down arrow button to set the Month MONTH YEAR DAY 8 acraki 15 UP AND DOWN BUTTONS CHANGES MONTH. DAY AND YEAR 7- 1 Oa* GO BACK BUTTON GOES BACK TO LAST SETTING DONE BUTTON ADVANCES TO TIME SErnwo SCREEN NEXT BUTTON ADVANCE TO NEXT SETTING 2. Press the Next button to advance to the Date 3. Use the Up or Down arrow button to set the Date. 4. Press the Next button to advance to the Year. 5. Use the Up or Down arrow button to set the Year. 6. Press the Done button to advance to the Time, 7. Use the Up or Down arrow button to set the Time. 69-17y)
-
 1
1 -
2
-
3
-
4
-
5
-
6
-
7
-
 8
8 -
 9
9 -
 10
10 -
 11
11 -
 12
12 -
 13
13 -
 14
14 -
 15
15 -
 16
16 -
 17
17 -
 18
18 -
19
-
20
-
21
-
22
-
23
-
24
-
25
-
26
-
27
-
28
-
29
-
30
-
31
 |
 |
