Hoover F7412 Manual - Page 19
If you have a problem
 |
UPC - 073502029251
View all Hoover F7412 manuals
Add to My Manuals
Save this manual to your list of manuals |
Page 19 highlights
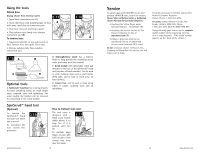
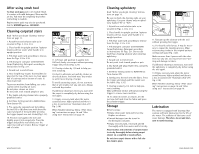
4. If you have a problem If a minor problem occurs, it usually can be solved quite easily when the cause is found by using the check list below. PROBLEM POSSIBLE CAUSE POSSIBLE SOLUTION Cleaner won't run. Not firmly plugged in. Plug unit in firmly. No voltage in wall plug. Check fuse or breaker. Blown fuse or tripped Replace fuse or reset breaker. breaker. Low suction. Recovery tank full/ Remove and empty recovery tank. automatic shut off engaged. Blockage In tool on end of Remove tool and clear blockage. hose. Recovery tank lid not on Make sure lid is on securely. correctly. Water tank empty, but detergent remains. Fill water tank. Clean water won't Clean water tank not firmly dispense. in place. Clean water tank or detergent container empty. Recovery tank lid not on correctly. Make sure tank is securely locked in position. Refill container according to instructions for surface being cleaned. Make sure lid is firmly in place. Detergent won't dispense Brushes/brush indicator won't rotate during floor cleaning. Valve cap clogged. Remove and clean valve cap (see instructions below). Dirty filter screen on bottom Clean screen. of unit. SpinScrub mode selector on Slide SpinScrub mode selector to SPILL PICK-UP / OFF. HARD TERRAIN or CARPET TERRAIN. To unclog valve 4.1 A 1. Remove clean water tank. 2. Turn valve cap (A) counterclockwise and remove. Soak valve cap in warm water for at least 15 minutes. Wipe cap dry. 3. Align slots (B) on cap with tabs (C) in opening. Turn cap clockwise to tighten. 4.2 A 4.3 C B www.hoover.com 22 How to attach optional tools 3.18 Unplug cleaner from electrical outlet. G 1. Place handle in upright position and remove hose from rack. All tools attach to the hose in the same manner: 2. Connect tool to hose by sliding it onto connector until the tab (G) locks it securely. H Using your thumb, push forward and up on the latch (H) to remove tool. After using 3.19 tool Drain suction hose by turning cleaner ON and holding nozzle up for several minutes. Do not press trigger. Unplug cleaner from electrical outlet. Disconnect hose and solution tube from cleaner. Drain solution tube by placing round end in sink and raising nozzle above your head. Press the trigger (Fig. 3.19). The tool caddy can be removed and hung on a coat hanger for storage or placed back on the cleaner (Fig.3.20). 3.20 Attaching scrub module (Optional) Using the scrub tool 3.21 J With a little solution, test the scrub tool on a hidden area before using on the desired surface. If no surface change is visible, continue to use as described below. 3.22 1. Open the tool door and remove the SpinScrub™ hand tool. 1. Attach hose and solution tube as instructed in Figs. 3.13 to 3.14. 2. Place handle in upright position. 2. Grasp the sides of the brush module and lift it from the base (J). 3. Snap scrub module onto the base. Note: If may be necessary to rotate the scrub module (K) slightly so it will align properly to the base. 3. Fill clean water tank according to instructions for Figs. 2.9 to 2.10. 4. Fill detergent container with HOOVER Hard Floor Cleaning Solution according to instructions for Fig. 2.11. 5. Attach tool to end of hose. 6. Hold scrub tool above area to be cleaned and press trigger to dispense solution. 7. Release trigger and scrub area with tool. Pick up dirty solution with squeegee as shown. 19 www.hoover.com
-
 1
1 -
2
-
3
-
4
-
5
-
6
-
7
-
8
-
9
-
10
-
11
-
12
-
13
-
 14
14 -
 15
15 -
 16
16 -
 17
17 -
 18
18 -
 19
19 -
 20
20
 |
 |
