Hoover FH50005 Manual - Page 6
HOW TO USE
 |
UPC - 073502029848
View all Hoover FH50005 manuals
Add to My Manuals
Save this manual to your list of manuals |
Page 6 highlights
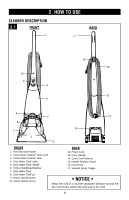
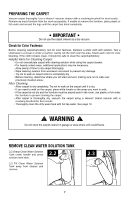
2. HOW TO USE Cleaner Description 2.1 FRONT BACK 17 FRONT 1. Non-Slip Grip Handle 2. Clean Water Solution Tank Latch 3. Clean Water Solution Tank 4. Dirty Water Tank Latch 5. Dirty Water Tank Handle 6. 5 Row Scrubbing Brushes 7. Dirty Water Tank 8. Dirty Water Tank Lid 9. Power On/Off Switch 10. Upper Handle Screw BACK 12. Power Cord 13. Carry Handle 14. Quick Cord Release 15. Handle Release Pedal 16. Cord Hook 17. Solution Spray Trigger • NOTICE • Wrap the cord in a counter-clockwise direction around the two cord hooks. Attach the plug end to the cord 6
-
 1
1 -
 2
2 -
 3
3 -
 4
4 -
 5
5 -
 6
6 -
 7
7 -
 8
8 -
 9
9 -
 10
10 -
 11
11 -
 12
12 -
13
-
14
-
15
-
16
-
17
-
18
-
19
-
20
-
21
-
22
-
23
-
24
-
25
-
26
-
27
-
28
-
29
-
30
-
31
-
32
-
33
-
34
-
35
-
36
-
37
-
38
 |
 |

6
2. HOW TO USE
2.1
CLEANER DESCRIPTION
BACK
FRONT
FRONT
1. Non-Slip Grip Handle
2. Clean Water Solution Tank Latch
3. Clean Water Solution Tank
4. Dirty Water Tank Latch
5. Dirty Water Tank Handle
6. 5 Row Scrubbing Brushes
7. Dirty Water Tank
8. Dirty Water Tank Lid
9. Power On/Off Switch
10. Upper Handle Screw
BACK
12. Power Cord
13. Carry Handle
14. Quick Cord Release
15. Handle Release Pedal
16. Cord Hook
17. Solution Spray Trigger
• NOTICE •
17
Wrap the cord in a counter-clockwise direction around the
two cord hooks. Attach the plug end to the cord