Hoover FH50220 Manual - Page 10
/3.1a - spinscrub
 |
UPC - 073502032039
View all Hoover FH50220 manuals
Add to My Manuals
Save this manual to your list of manuals |
Page 10 highlights
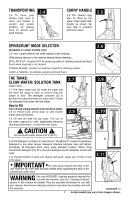
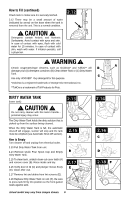
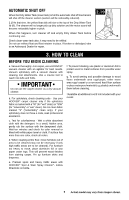
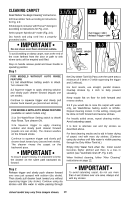
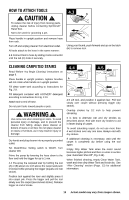
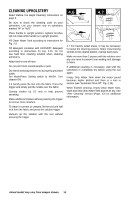
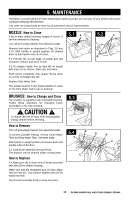
8&5 8&5 %3: %3: Cleaning Carpet 3.1/3.1a Read "Before You Begin Cleaning" instructions. 3.2 Fill Clean Water Tank according to instructions for Fig. 2.9. Fill detergent container with Hoover® detergent according to instructions for Fig. 2.10. RINSE WASH Select proper SpinScrub® mode (Fig. 2.6). Dry hands and plug cord into a properly grounded outlet. Pull Trigger = WET Release Trigger = DRY IMPORTANT Do not clean over floor electrical outlets. To avoid walking on damp carpet, start at the end of the room farthest from the door or path to sink where tanks will be emptied and filled. 3.2a AUTO RINSE WASH 3.3 RINSE WASH Step on handle release pedal and lower handle to operating position. Step 1 FOR MODELS WITHOUT AUTO RINSE FEATURE 3.1 Set Wash/Rinse Setting switch to Wash. Turn cleaner ON. 3.2 Squeeze trigger to apply cleaning solution and slowly push cleaner forward (equals one wet stroke). Continue to squeeze trigger and slowly pull cleaner back toward you (second wet stroke). FOR MODELS WITH AUTO RINSE FEATURE (available on select models only) 3.1a Set Wash/Rinse Setting switch to Wash/ Auto Rinse. Turn cleaner ON. 3.2a Squeeze trigger to apply cleaning solution and slowly push cleaner forward (equals one wet stroke). The cleaner washes on the forward stroke. Continue to squeeze trigger and slowly pull cleaner back toward you (second wet stroke). The cleaner rinses the carpet on the backward pass. IMPORTANT To assure proper rinsing, it is important to keep the cleaner on the same path backward as forward. Step 2 Release trigger and slowly push cleaner forward over area just sprayed with solution (dry stroke). Then slowly pull cleaner back toward you without squeezing trigger (dry stroke). Continue using dry strokes until little water is visible passing through the Dirty Water Tank lid (Pass over the same area a minimum of 4 times = 2 while squeezing the trigger and 2 without). For best results, use straight, parallel strokes. Overlap strokes by 1 inch to help prevent streaking. Keep nozzle flat on floor for both forward and reverse strokes. 3.3 If you would like to rinse the carpet with water only, set Wash/Rinse Setting switch to RINSE. Repeat cleaning motion. In this setting, rinsing will be done on both forward and reverse strokes. For heavily soiled areas, repeat cleaning motion. Avoid saturating carpet. It is best to alternate wet and dry strokes as described above. For best cleaning results and to aid in faster drying of carpet, end with more dry strokes. (Continue using dry strokes until little water is visible passing through the Dirty Water Tank lid.) Empty Dirty Water Tank when the motor sound becomes higher pitched and there is a loss in suction (see "Automatic shut-off", Fig. 2.19). When finished cleaning, follow "After Cleaning" instructions on page 12. IMPORTANT To avoid saturating carpet, do not use more than 4 wet strokes over one area. Always end with dry strokes. Actual model may vary from images shown. 10
-
 1
1 -
2
-
3
-
4
-
 5
5 -
 6
6 -
 7
7 -
 8
8 -
 9
9 -
 10
10 -
 11
11 -
 12
12 -
 13
13 -
 14
14 -
 15
15 -
16
-
17
-
18
-
19
-
20
-
21
-
22
-
23
-
24
-
25
-
26
-
27
-
28
-
29
-
30
-
31
-
32
-
33
-
34
-
35
-
36
-
37
-
38
-
39
-
40
-
41
-
42
-
43
-
44
-
45
-
46
-
47
-
48
-
49
-
50
-
51
-
52
-
53
-
54
-
55
-
56
-
57
-
58
-
59
-
60
 |
 |