Hoover ONEPWR Handheld Sprayer with ONEPWR Rechargeable Battery Product Manual - Page 4
Operation
 |
View all Hoover ONEPWR Handheld Sprayer with ONEPWR Rechargeable Battery manuals
Add to My Manuals
Save this manual to your list of manuals |
Page 4 highlights
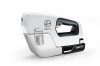
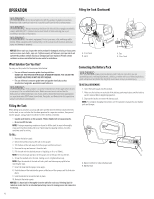
OPERATION Filling the Tank (Continued) WARNING: Do not allow familiarity with the product to make you careless. Remember that a careless fraction of a second is sufficient to inflict serious injury. WARNING: Always wear eye protection with side shields or goggles marked to comply with ANSI Z87.1. Failure to do so could result in fluids entering your eyes resulting in possible serious injury. WARNING: Use safety equipment. Protect your eyes, skin, and lungs while mixing, filling, spraying, and cleaning. Failure to do so may result in serious personal injury and damage to property. NOTICE: Before each use, inspect the entire product for damaged, missing, or loose parts such as screws, nuts, bolts, caps, etc. Tighten securely all fasteners and caps and do not operate this product until all missing or damaged parts are replaced. Please contact customer service or an authorized service center for assistance. B A A. 16 oz. Tank B. Latch A B A. Cap B. 16 oz. Tank What Solution Can You Use? You may use this product for the purpose listed below: • For use with most consumer grade cleaning solutions. DO NOT USE THIS SPRAYER WITH BLEACH, HYDROGEN PEROXIDE, PINE SOL OR PINE OIL BASED SOLUTIONS. DO NOT USE WITH VINEGAR. • For use with most consumer grade home and garden chemicals such as insecticides, fungicides, weed killers and fertilizers. WARNING: If this product is used for herbicide/insecticide applications do not re-purpose it for use with disinfectants. Obtain a second nozzle set and tool for dedicated use with disinfectants only. Tools used for herbicide/insecticide applications are regulated under EPA Federal Insecticide, Fungicide, and Rodenticide Act regulations and are considered contaminated. Filling the Tank When adding spray solutions, you may add water and the desired chemical solution directly into the tank, or use a solution that has been premixed in a separate container, then poured into the sprayer, using a funnel if needed. For either method, remember: • Liquids used must be as thin as water. Thicker liquids will not spray properly. • Do not overfill the tank. NOTE: If using a measuring container or funnel to fill the tank, be sure to thoroughly clean and rinse these items after use. If premixing the spraying solution, rinse the container used for mixing. TO FILL: 1. Remove the battery pack. 2. Unlock the latches securing the tank to the sprayer. 3. Tilt the base of the tank away from the sprayer and then remove it. 4. Unscrew the cap and remove it from the tank. 5. Fill the tank with the desired amount of liquid (up to 16 oz or 500mL). NOTE: To ensure proper operation of the sprayer, do not fill past the max fill line. 6. Screw the cap back onto the tank, making sure it is tightened securely. NOTE: Wipe the outside of the tank with a dry cloth and clean up any spills before inserting the tank. 7. Insert the tank into the sprayer at an angle. 8. Push the base of the tank into the groove at the base of the sprayer until it clicks into place. 9. Lock the latches to secure the tank in place. 10. Reinstall the battery pack. NOTICE: It is important to thoroughly clean the unit after each use. Allowing liquid to remain in an idle tool for an extended period may cause its moving pieces and connectors to seize up. Connecting the Battery Pack WARNING: Always remove battery pack from your tool when you are assembling parts, making adjustments, cleaning, or when not in use. Removing battery pack will prevent accidental starting that could cause serious personal injury. TO INSTALL OR REMOVE: 1. Insert the battery pack into the product. 2. Make sure the latches on each side of the battery pack snap in place and the battery pack is secured before beginning operation. 3. Depress the latches to remove the battery pack. NOTE: For complete charging instructions, see the operator's manuals for your battery pack and charger. B A A. Depress latches to release battery pack B. Battery Pack 4
-
 1
1 -
 2
2 -
 3
3 -
 4
4 -
 5
5 -
 6
6 -
 7
7 -
 8
8 -
 9
9 -
 10
10 -
11
-
12
-
13
-
14
-
15
-
16
-
17
-
18
-
19
-
20
-
21
-
22
-
23
-
24
 |
 |
